Editor’s note: The following selections were excerpted from FM 21-150: Unarmed Defense for the American Soldier, an Army manual published in 1942, which “describes a method of self-protection available to the American soldier, if through any circumstance he is unarmed or unable to use his weapons.” These judo-inspired moves were taught to GIs during WWII.
PURPOSE OF TRAINING
The object of this training is to develop the soldier in the art of unarmed self-defense, and to improve his skill in the use of his basic weapons, through speeded reflexes. Confidence in his own ability unarmed, like confidence in his weapons, makes a man a better soldier.
NECESSITY FOR TRAINING IN UNARMED DEFENSE
The average soldier, if trained only in the use of his weapons, loses his effectiveness if these weapons are lost or fail to function. However, particularly in hand-to-hand fighting, if a soldier should be deprived of his weapon or have it destroyed, he is at the mercy of the enemy. This appears to apply mainly to the Infantry, and probably the greatest value of American unarmed defense will be to that arm. Nevertheless, in these days of fluid warfare, troops in rear echelons, artillery, and antitank units might find themselves in hand-to-hand combat with no defensive weapons except sidearms and bare hands.
DEFENSE AGAINST RIGHT-HAND GRIP ON RIGHT WRIST, OR LEFT-
HAND GRIP ON LEFT WRIST
In the case illustrated by Figure 9-1, your opponent has grasped your right wrist with his right hand.
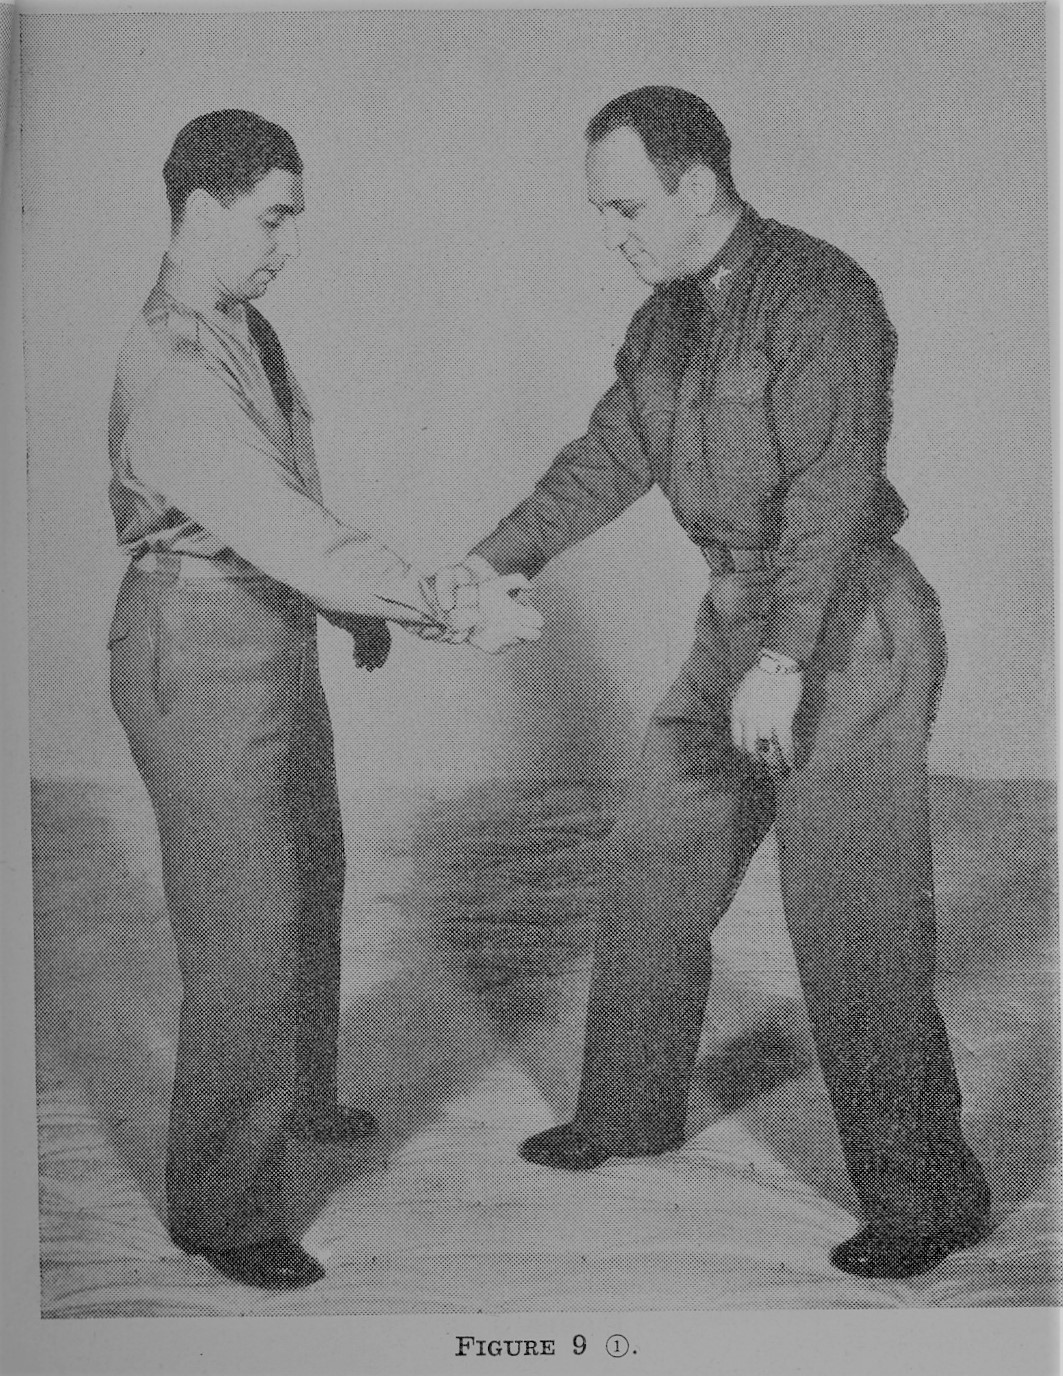
Your immediate reaction is to grasp his right wrist with your right hand, taking a long step to his right rear with your left foot, pulling his right arm underneath your left arm as illustrated in Figure 9-2.
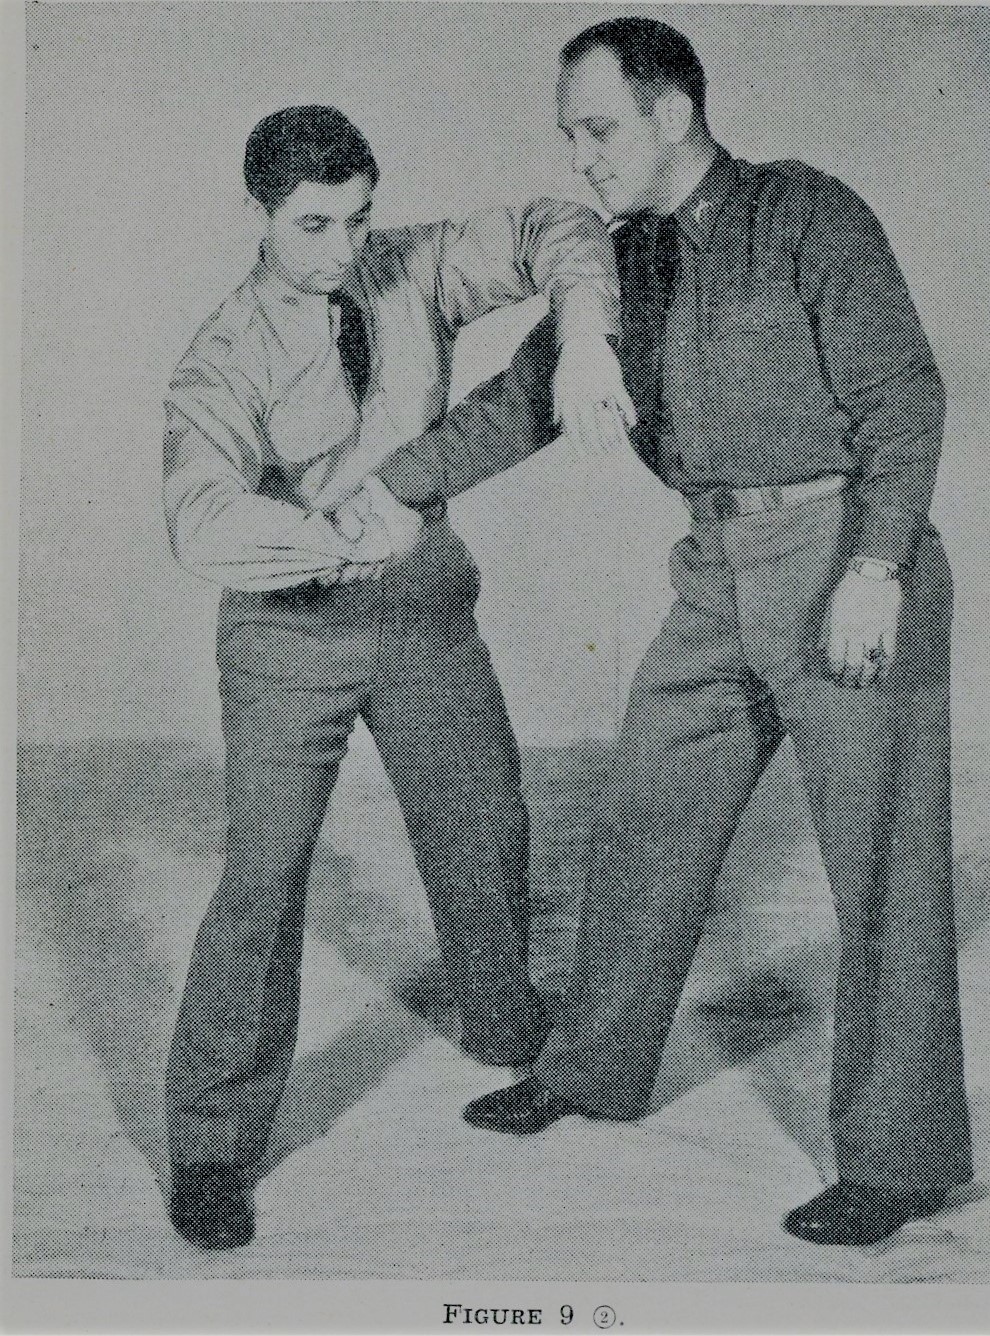
Wrapping your upper arm over your opponent’s upper arm and bringing your forearm or wrist underneath a spot about 1 inch above his elbow, you will then clamp your left hand on your chest as illustrated in Figure 9-3.
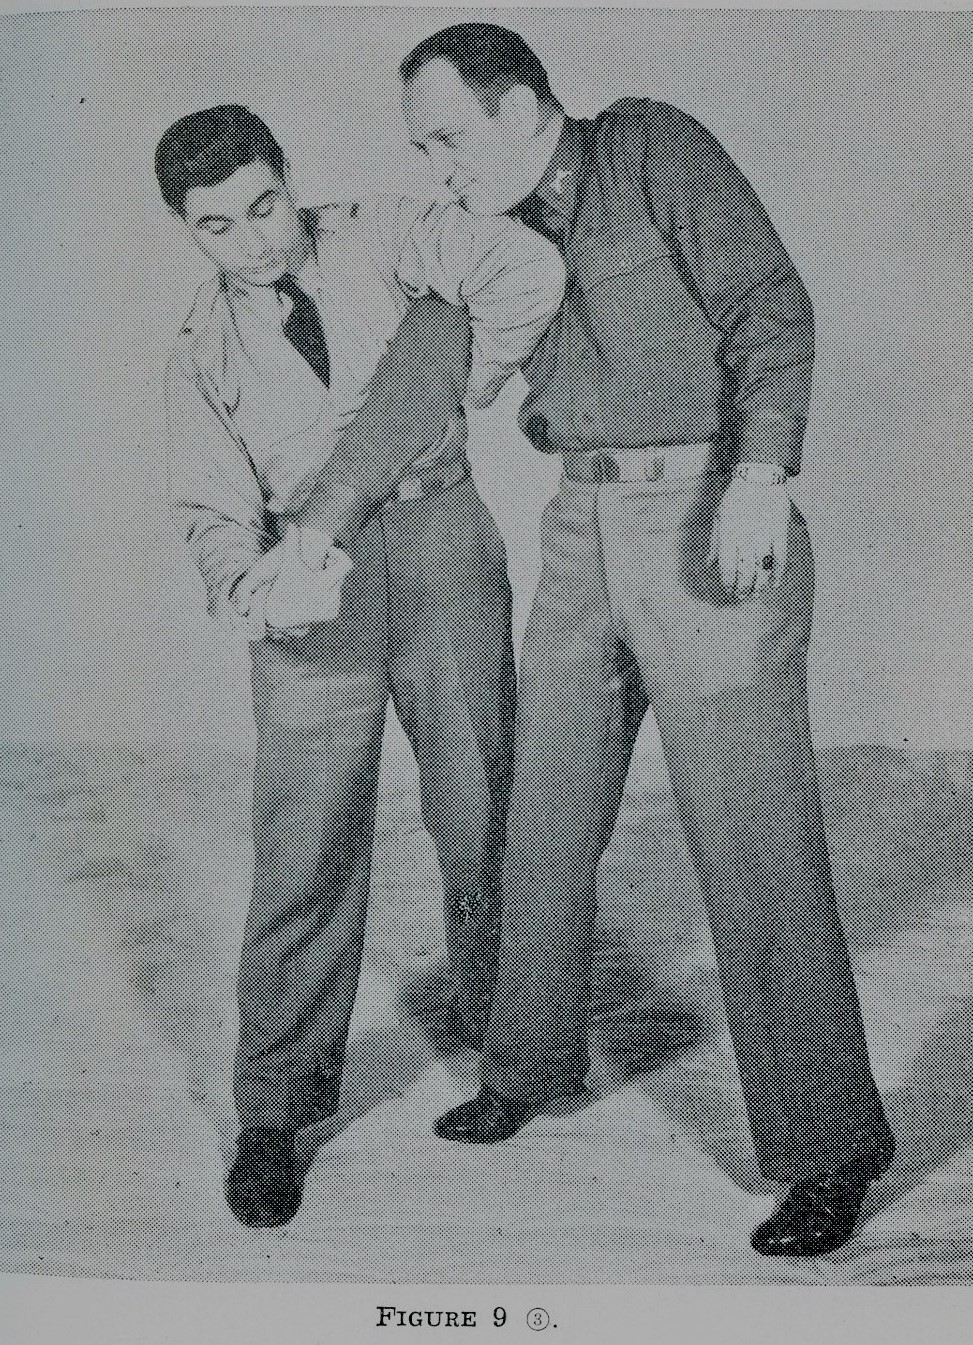
You are now in position to bring pressure on either your opponent’s elbow or his ulna nerve by pulling up with your left forearm and pushing down with your right arm. This will force your opponent to his toes and give you complete control of the situation.
Care should be taken in working this defense, since it is very easy to break an arm utilizing this procedure.
ESCAPE FROM FIRST REAR UNDERARM BODY HOLD
The attack illustrated in Figure 15-1 shows your opponent behind you, grasping you around the waist and with his head hidden directly behind yours.

Your immediate reaction is to bring your head backward strongly, striking him in the face with the back of your head as illustrated in Figure 15-2.
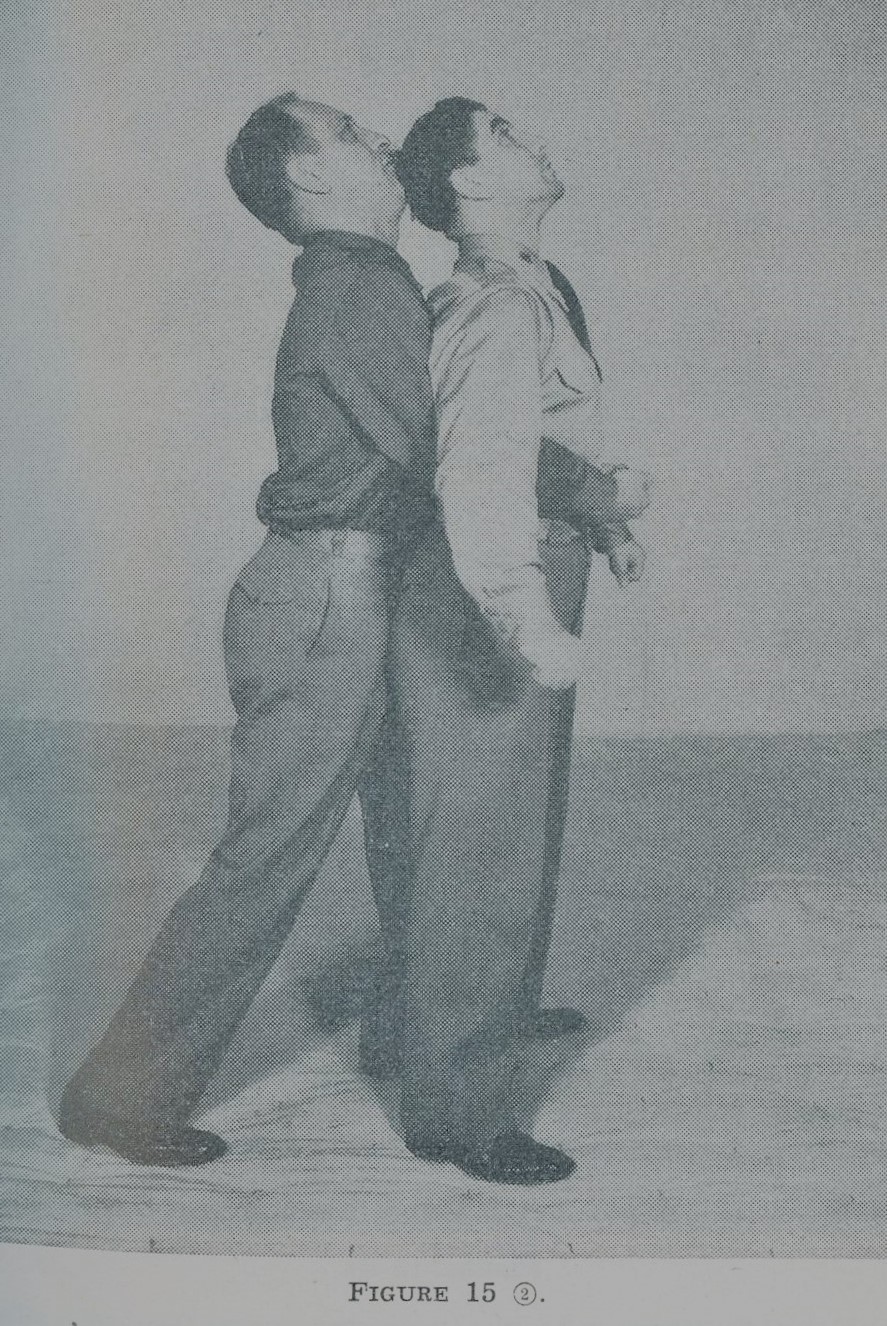
Your next movement is to follow up by bringing both elbows shoulder high and pivoting swiftly from left to right and from right to left as illustrated in Figure 15-3.
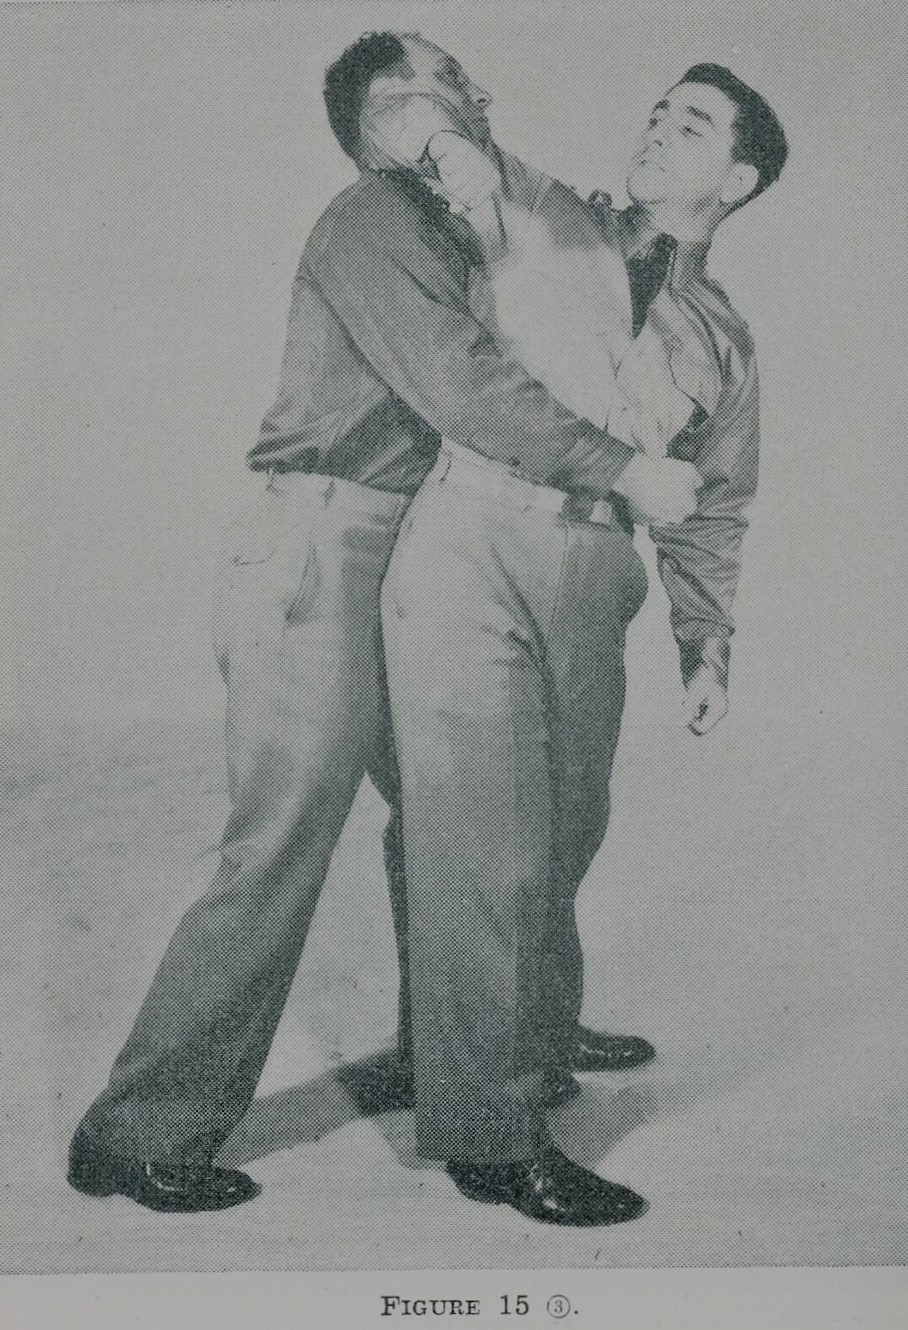
It is impossible for you to miss striking him somewhere in the head by means of this movement. On being struck in this manner, the results are usually devastating to your attacker.
ESCAPE FROM FIRST OVERARM REAR BODY HOLD
Your opponent grasps you from the rear and over the arms tightly. (Figure 20-1.)
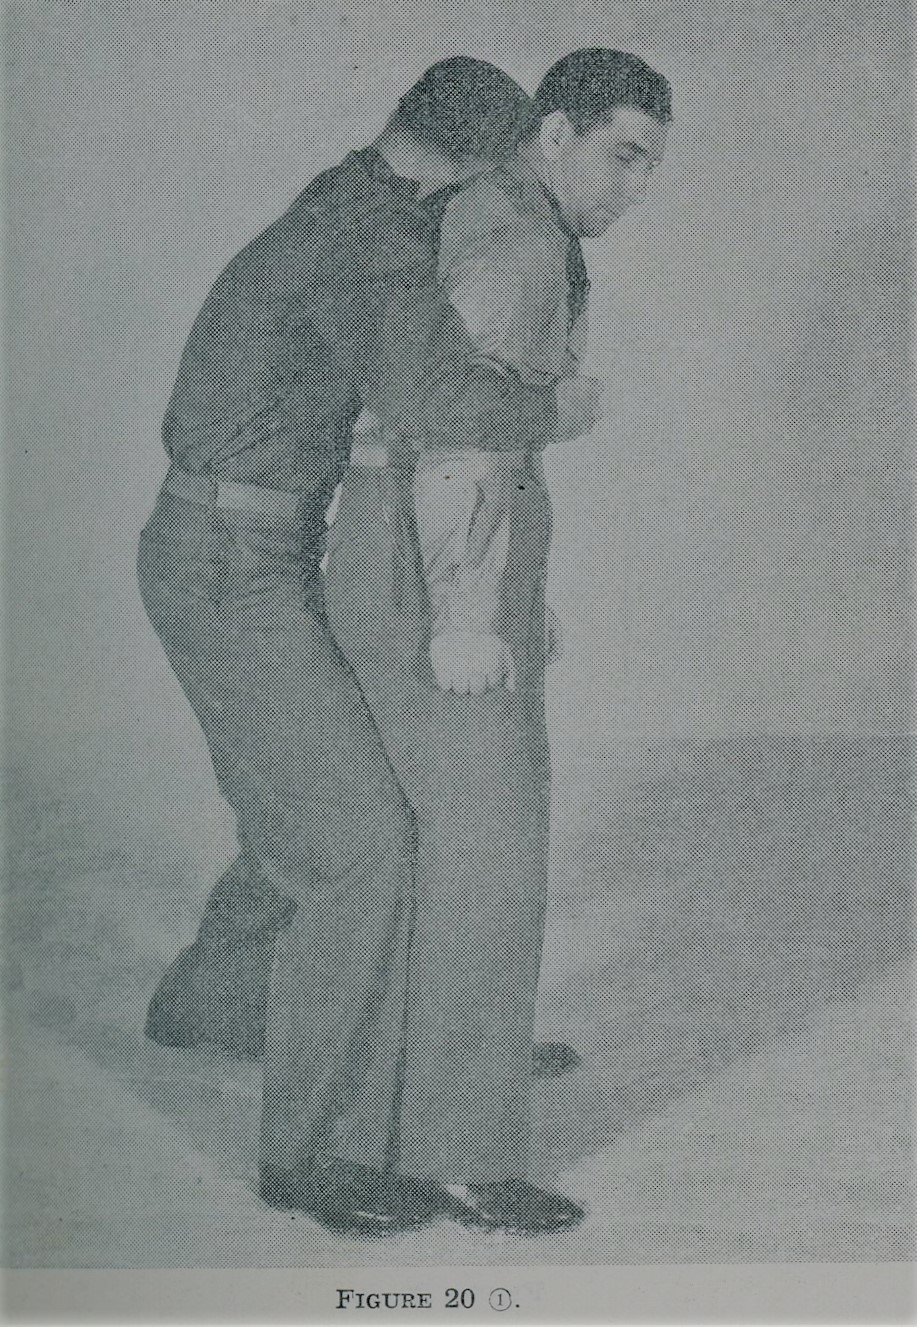
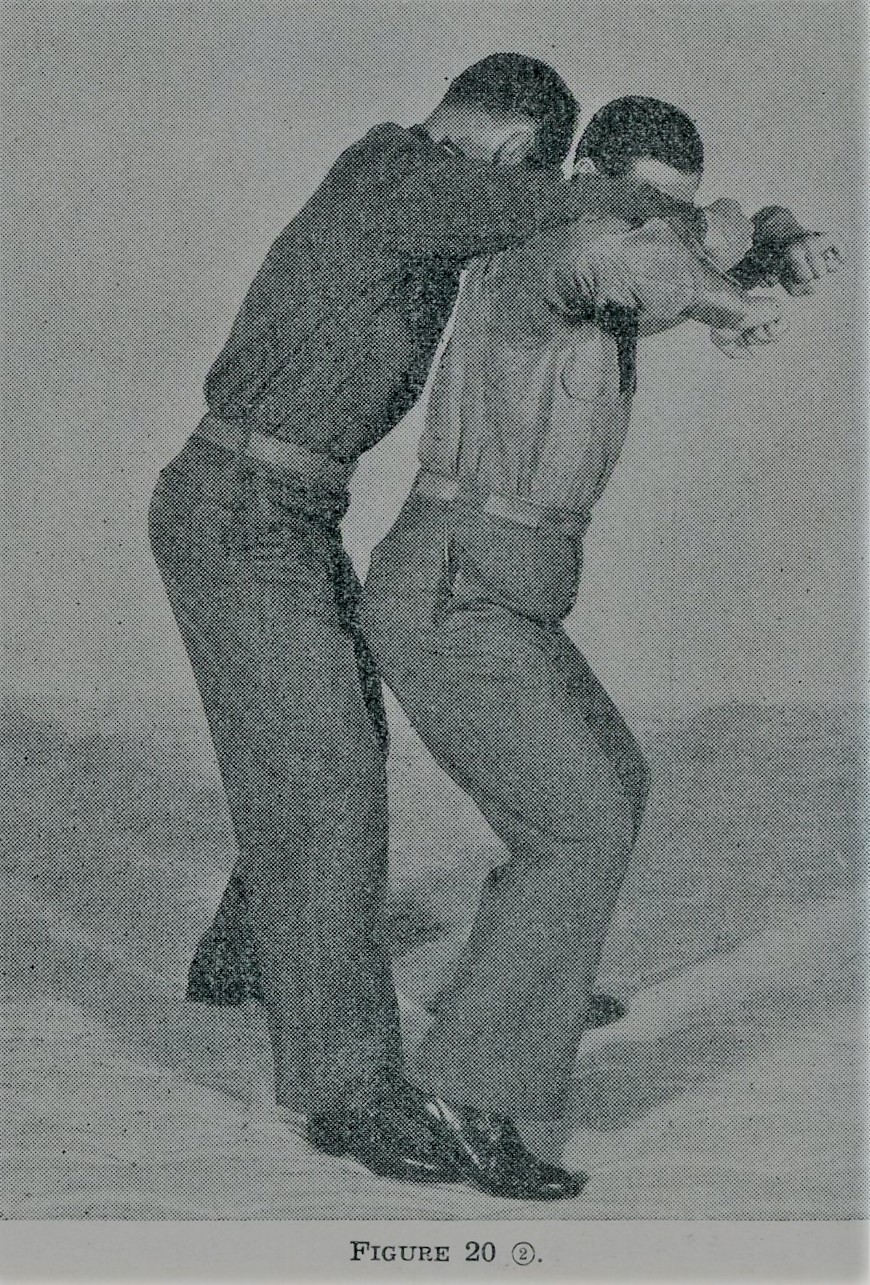
Your initial movement is to cause him to loosen his hold even momentarily by either stepping on his instep or kicking him in the shin with your heel. The moment you feel the hold loosen, lower your body by bending your knees, and, at the same time, raise your elbows to shoulder height. (Figure 20-2.)
From this position swing your elbows backward alternately; swing with the power of the shoulders and midsection, your elbows striking your opponent in either the short ribs or the solar plexus. (Figure 20-3.)
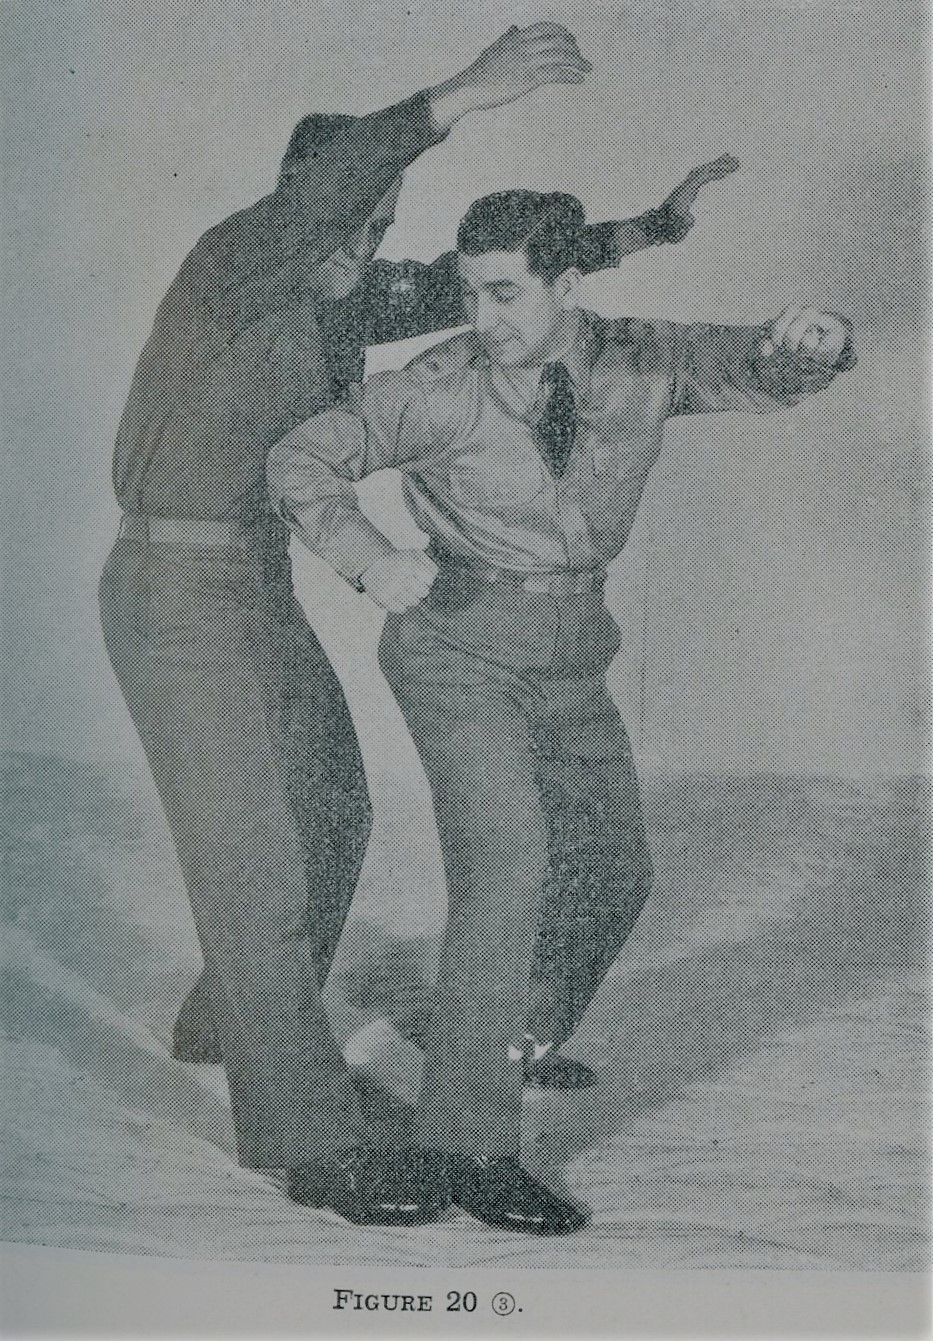
The first blow is usually a knock-out but very seldom can your opponent release his hold entirely before being struck two or three times.
FIRST DEFENSE AGAINST TWO-HAND FRONT CHOKE
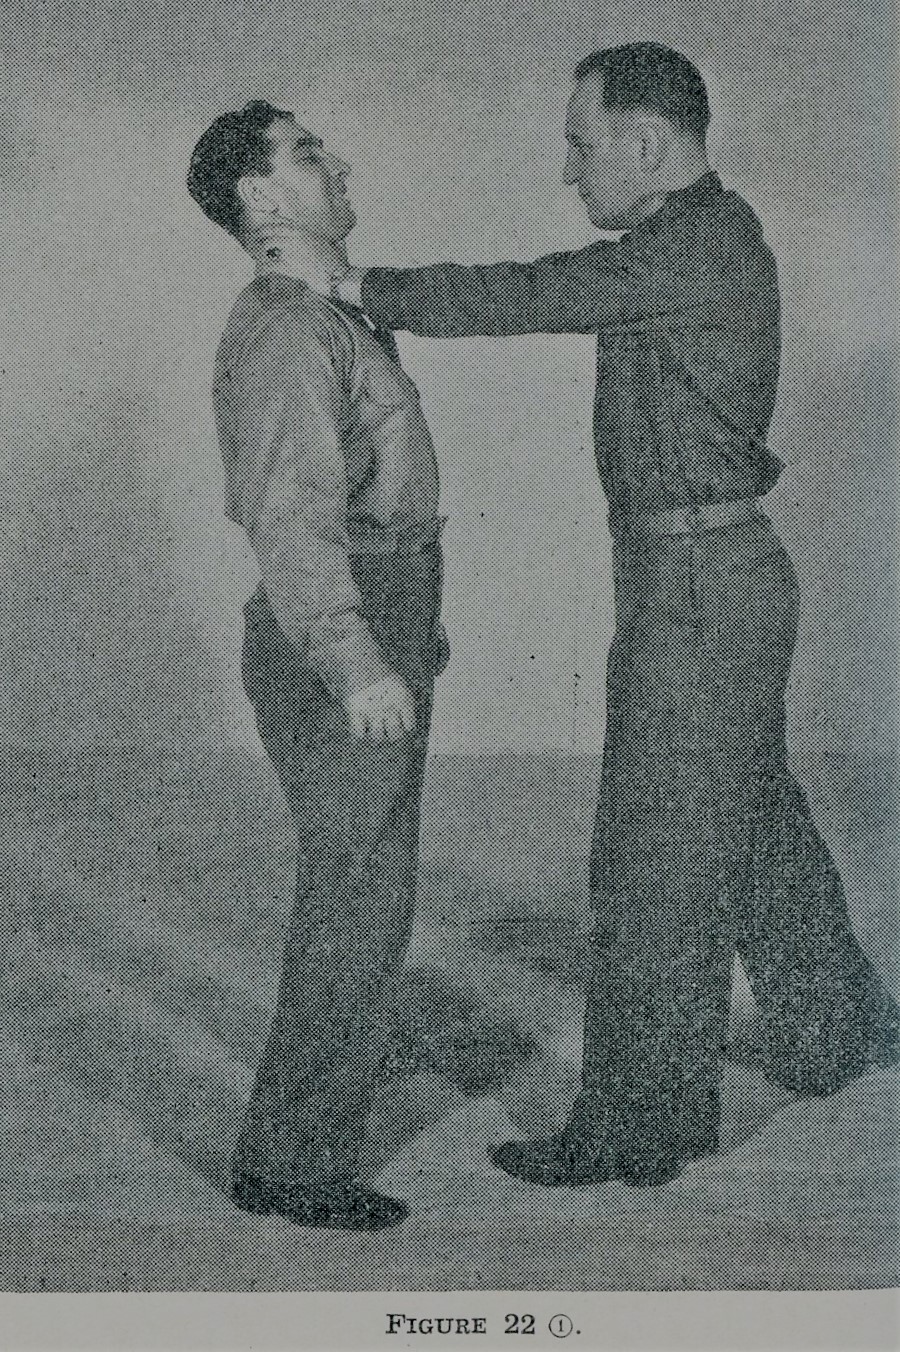
Your opponent grasps you around the throat from the front with both hands. (Figure 22-1.)
Reach up with your right hand, grasping the base of his thumb with your four fingers and the back of his hand with your right thumb, at the same time as you bend slightly to the right. (Figure 22-2.)
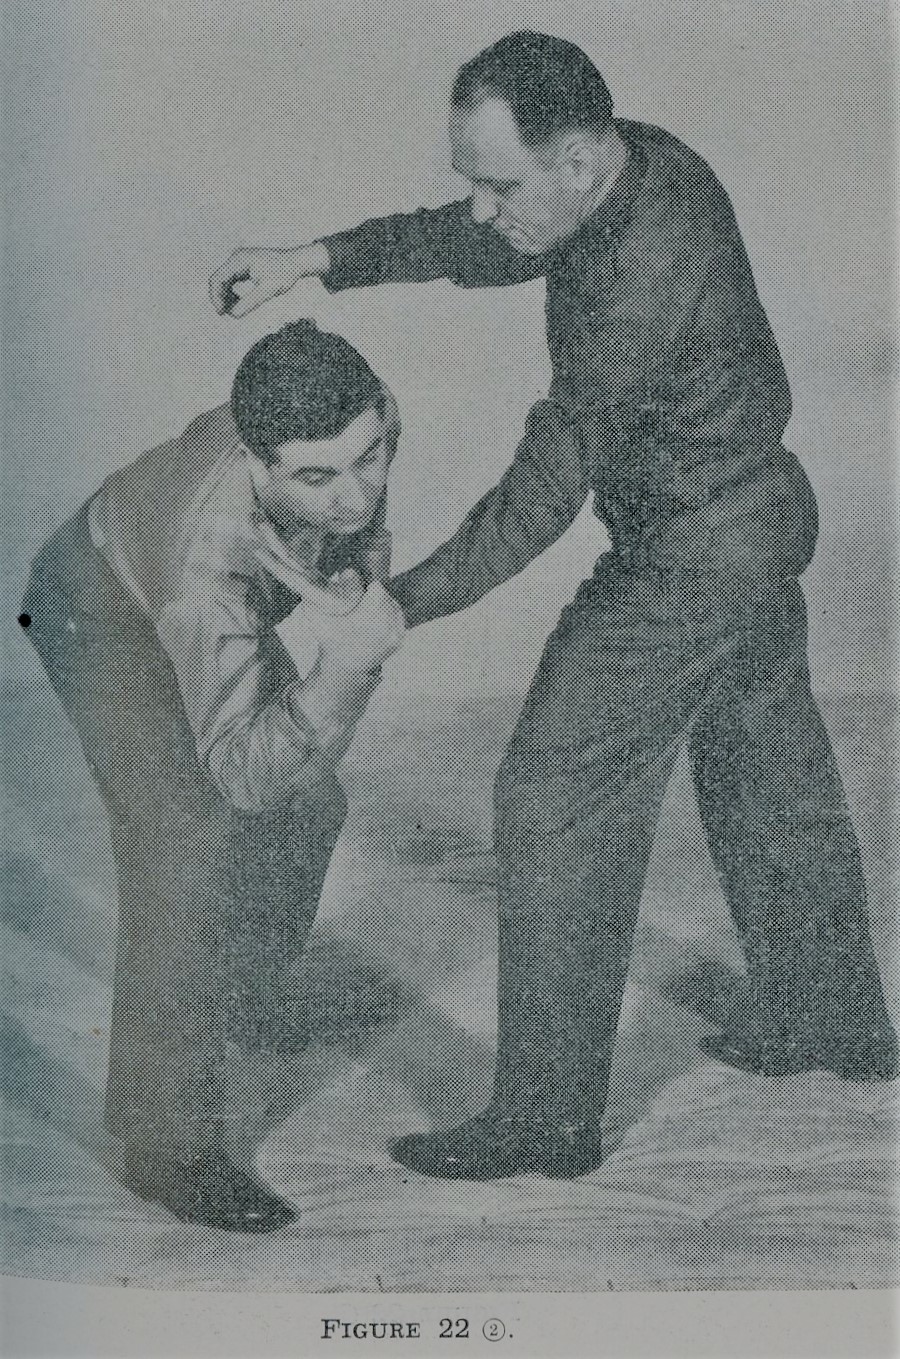
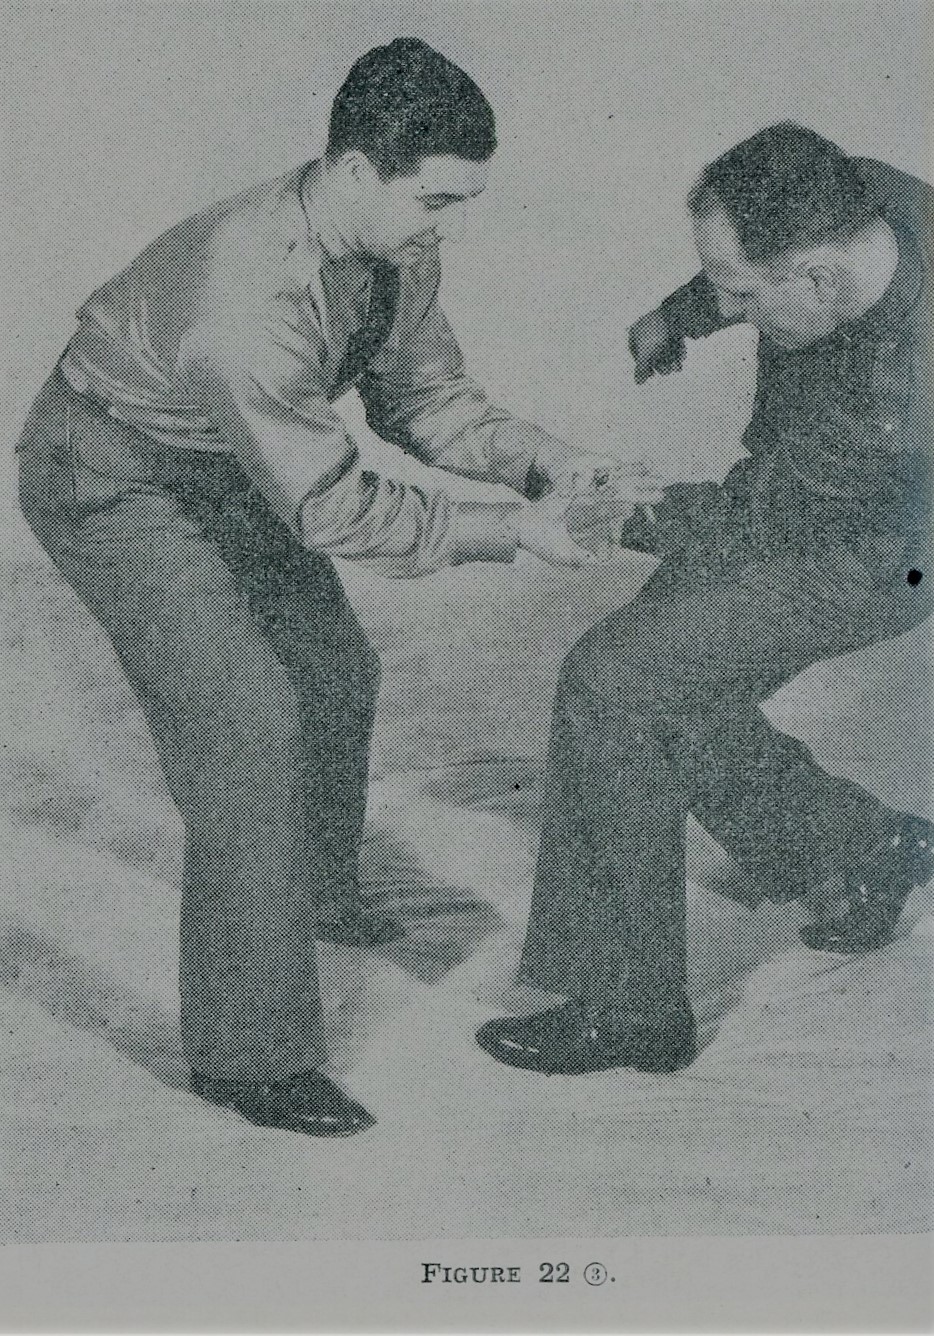
This movement will loosen his grip on your throat and make it a simple matter for you to remove his right hand. Immediately reinforce the right-hand grip with a similar grip with your left hand, crossing your thumbs on the back of his hand. By applying pressure on the back of the hand toward the opponent’s wrist, your opponent will be forced to the ground. (Figure 22-3.) If this entire action is made swiftly, your opponent will find himself on the ground a split second after he grasps you by the throat.
FIRST DEFENSE AGAINST TWO-HAND FRONT CHOKE AGAINST THE WALL
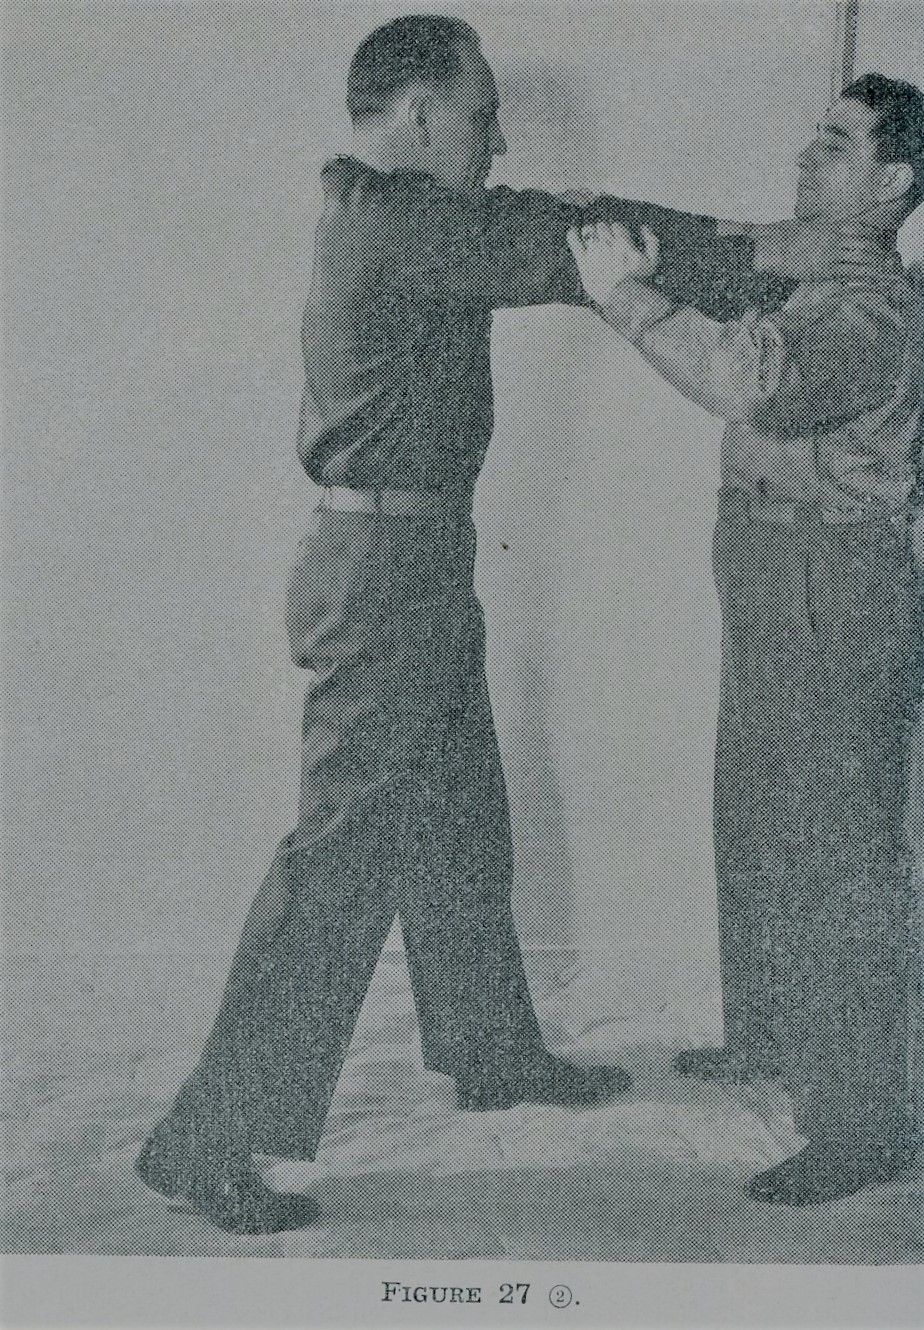
Ordinarily an individual who attempts to choke you in this fashion extends his arms, squeezes with the fingers, and pushes you against the wall. (Figure 27-1.)
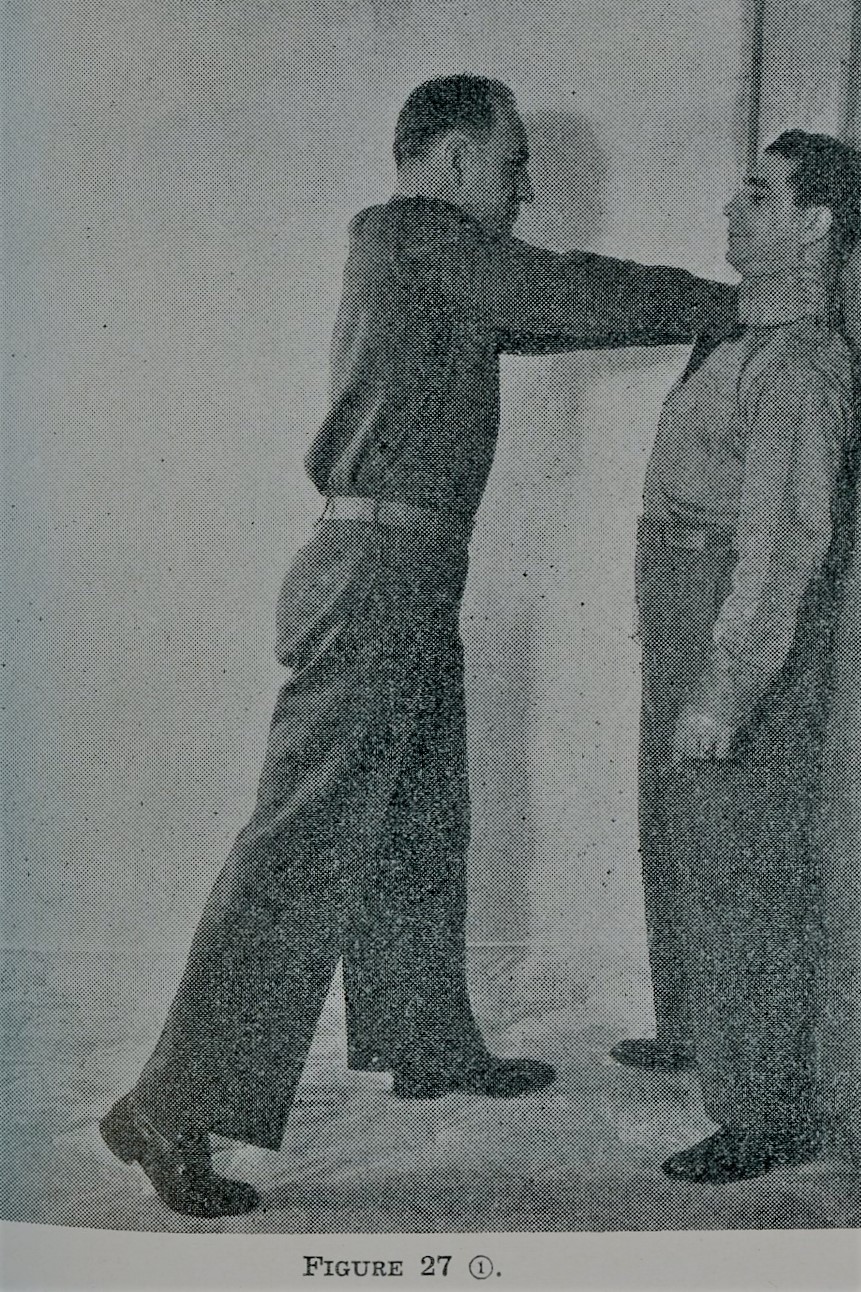
Your immediate action is to bring the heel of your hands, one on either side of his elbows, applying pressure inward (toward each other) and away from you. (Figure 27-2.) The reaction is such as to prevent your opponent from using the power of his fingers, and he will find that he cannot choke you, try as he will.
DEFENSE AGAINST DOWNWARD STROKE OF KNIFE
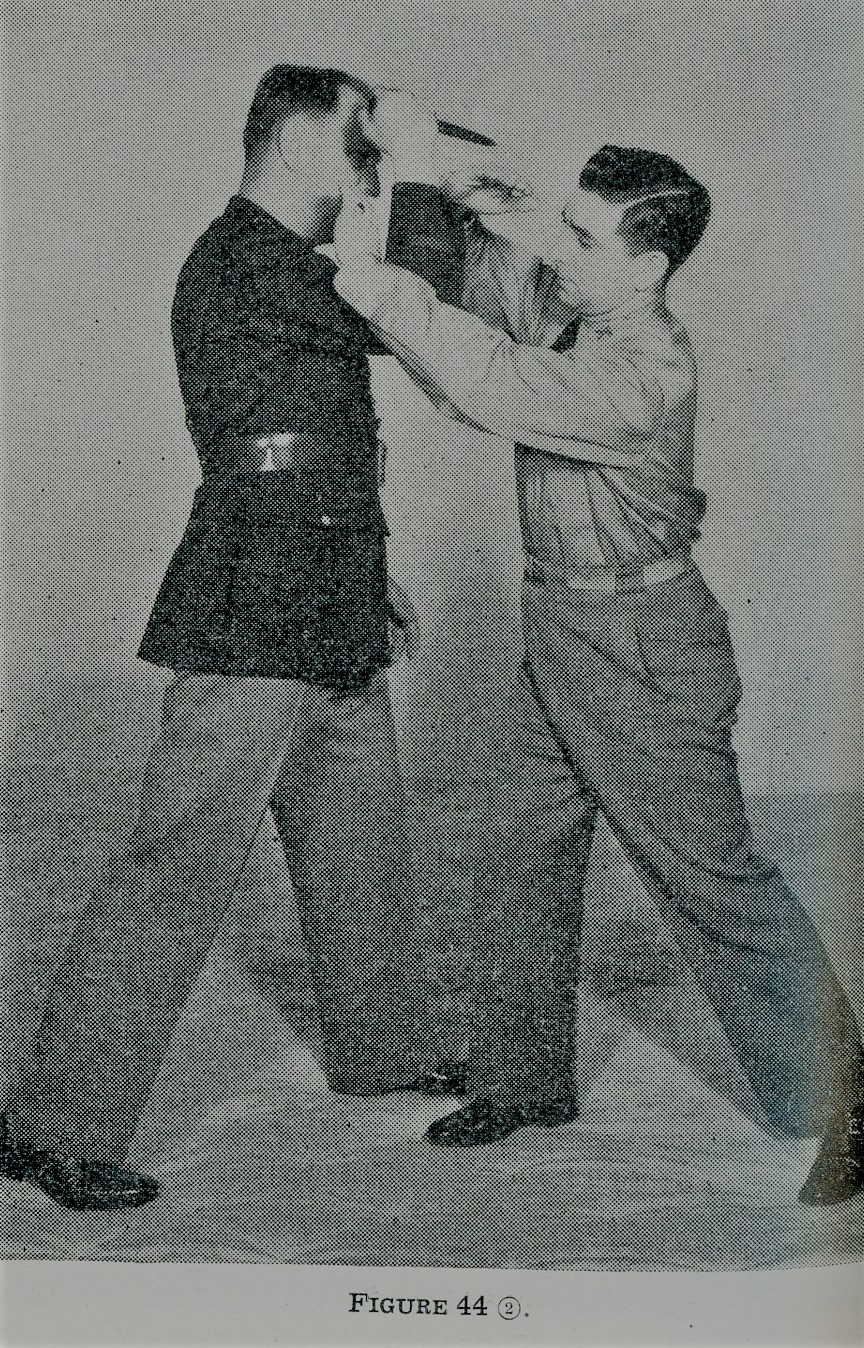
Your opponent attacks in the manner illustrated in figure 44-1. Only an angry man or an individual who had no training in the use of the knife would use this mode of attack, since the blade is very likely to be deflected by the breast bone or ribs.

You ward off the blow by presenting your right forearm against the striking arm of your opponent and strike him in the crook of the right elbow with the thumb side of your left forearm or wrist. (Figure 44-2.) This will cause his arm to bend. Then grasp your right wrist with your left hand, bring your elbows close to your body, and bending swiftly at the waist, bring extreme pressure to bear on your opponent’s arm, causing him to fall backward and lose his weapon.
DEFENSE AGAINST UPWARD STROKE OF KNIFE
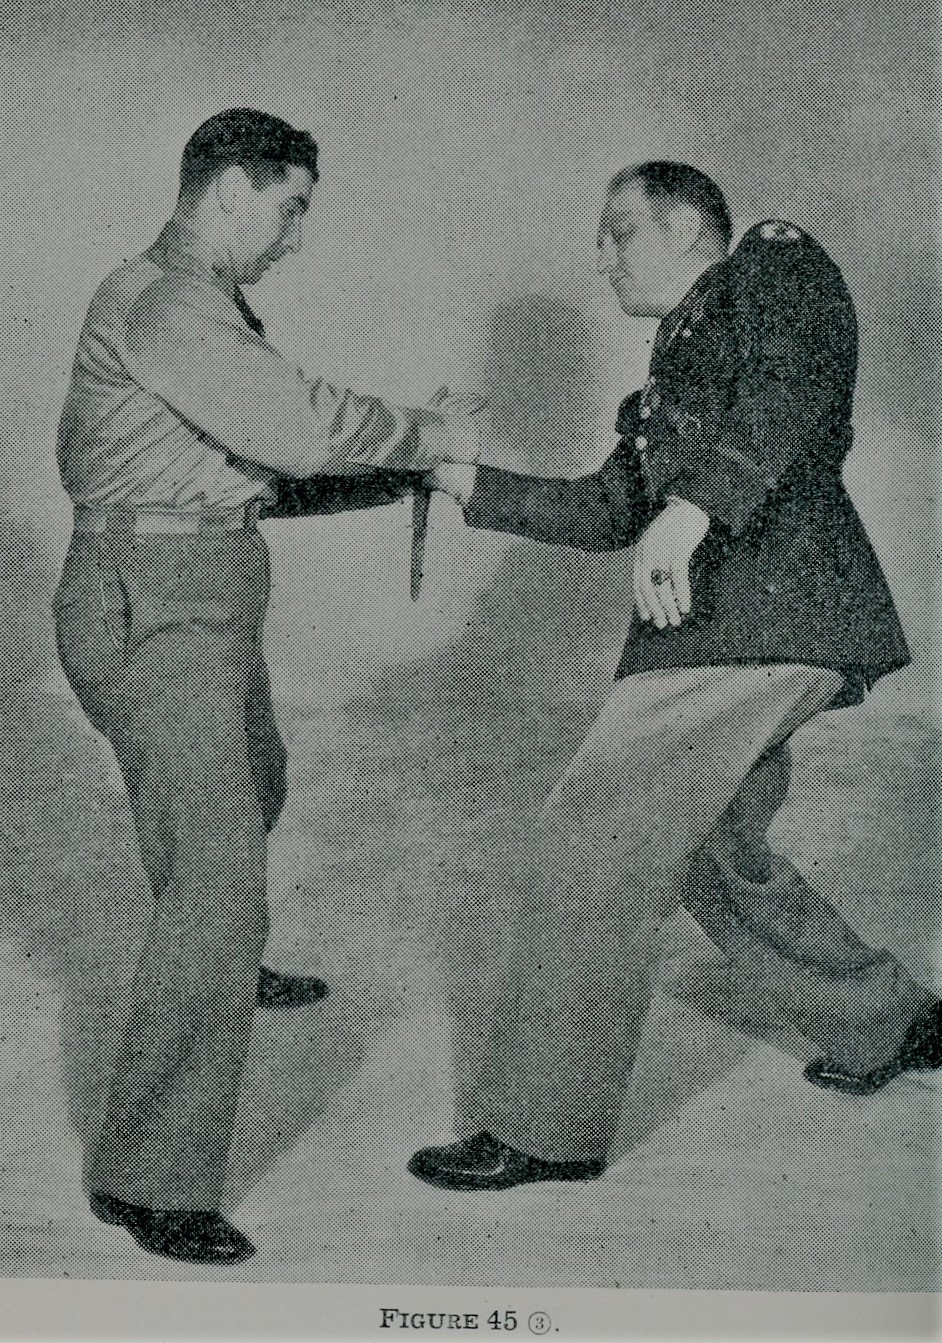
The individual who uses the knife in the manner illustrated in figure 45-1 is extremely dangerous, since he strikes upward with a short snappy movement, aiming at the soft parts of the abdomen. If he strikes home, he is likely to impose a fatal wound.

You block the stroke by bringing the little finger edge of your left arm against your opponent’s wrist or forearm. As an added precaution, a simultaneous movement will be the side twist of the body as described in previous sections. Right leg is straightened, left knee is bent, and your body turns to the right. Immediately the blow is stopped, the right hand grasps your attacker’s right hand with your thumb on the back of the knuckles and your fingers around the palm side of his hand. Contact is retained with your left arm against his left forearm (45-2).

You now reinforce your right-hand hold with a similar hold with your left hand which will result in your thumbs crossing on the back of his knuckles and the fingers of both hands meeting in the center of the palm of his hand. You will now twist his wrist to your left and bend his hand at an angle at 45 degrees toward his forearm (Figure 45-3).
DEFENSE AGAINST SIDE STROKE WITH CLUB
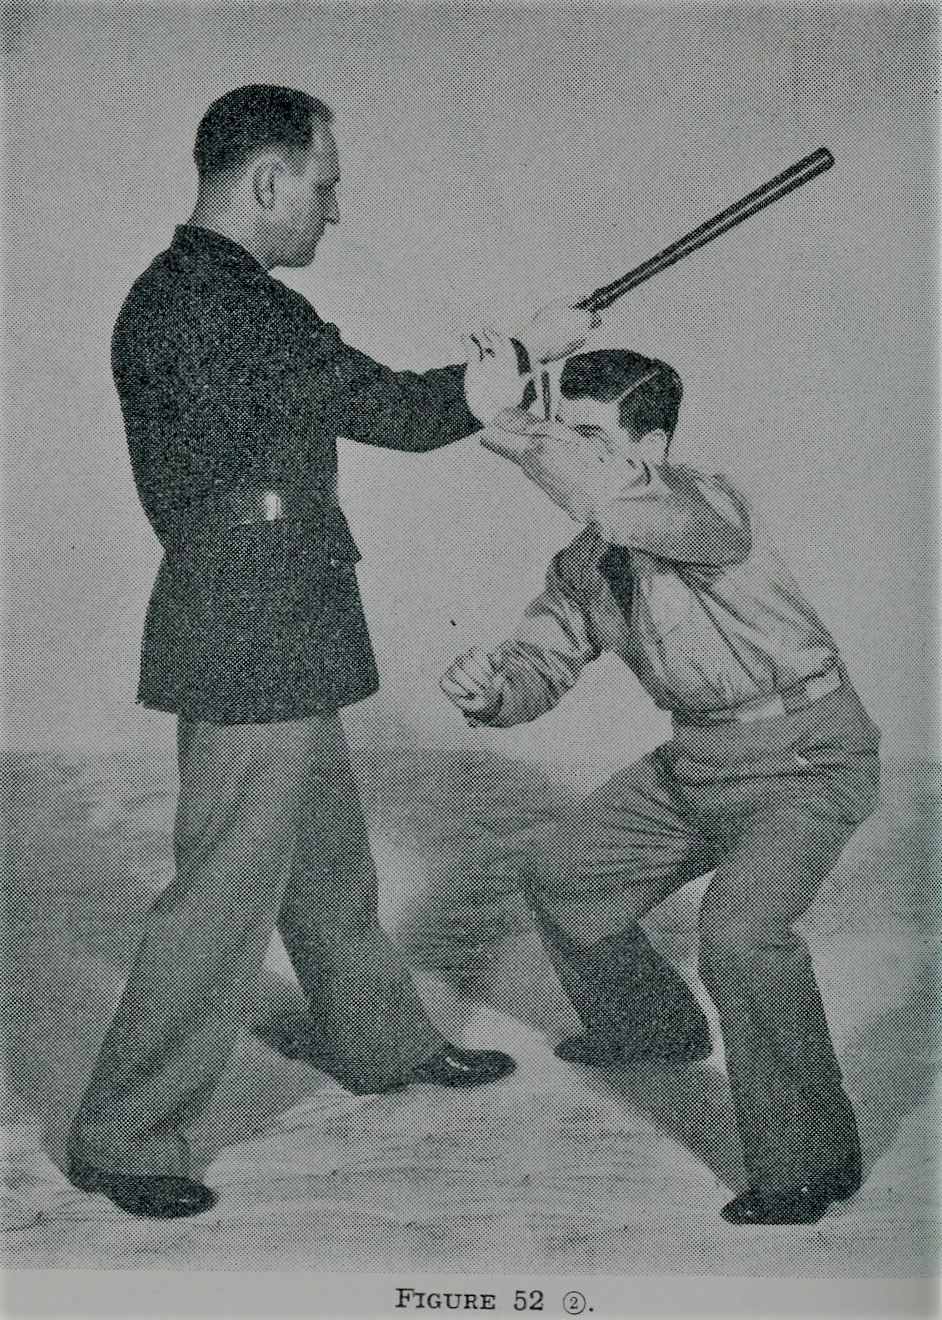
The more experienced individual will strike a slanting sideward blow at the side of the head as illustrated in Figure 52-1.

You will make no attempt to stop the blow, but will lower your head out of range by bending the knees, at the same time reaching upward with your left hand or arm, without grasping your opponent’s club arm, and striking your opponent’s forearm, continuing its momentum over your head. See Figure 52-2.
This will turn your opponent completely off balance. You will now take a long step with your right leg to your opponent’s right, at the same time twisting your body to left and raising your right arm shoulder-high with the back of your body and shoulders. Your elbow will make contact in the soft spot of your opponent’s side between the hipbone and the short ribs. See Figure 52-3.
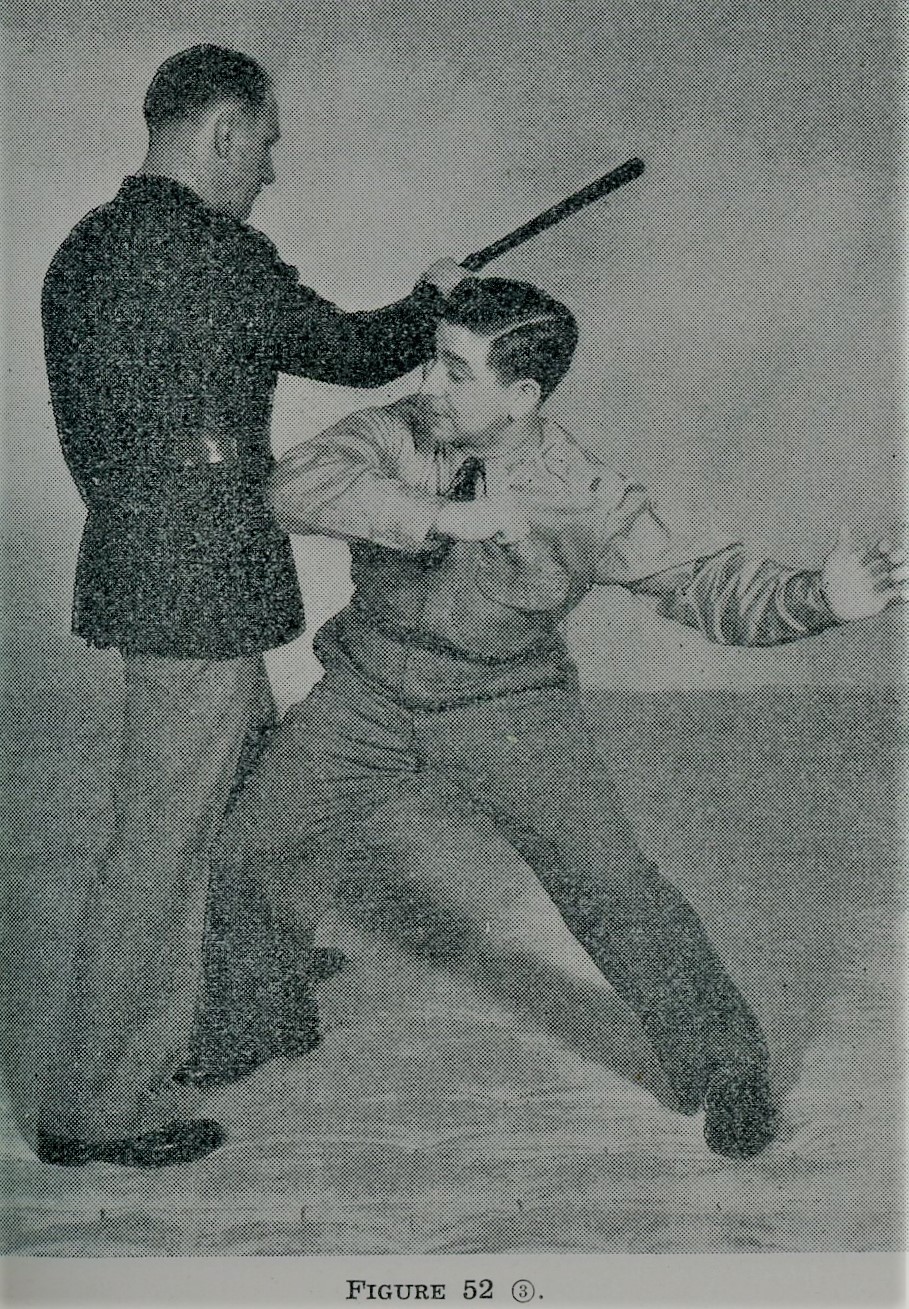
A man struck in this manner will drop as though shot.
DEFENSE AGAINST GUN IN FRONT
Your opponent orders you to raise your arms as illustrated in Figure 58-1.

Note that while the hands are raised, the elbows are maintained as low as possible. You immediately use your side body pivot as previously described and strike your opponent’s wrist with your left forearm (Figure 58-2).
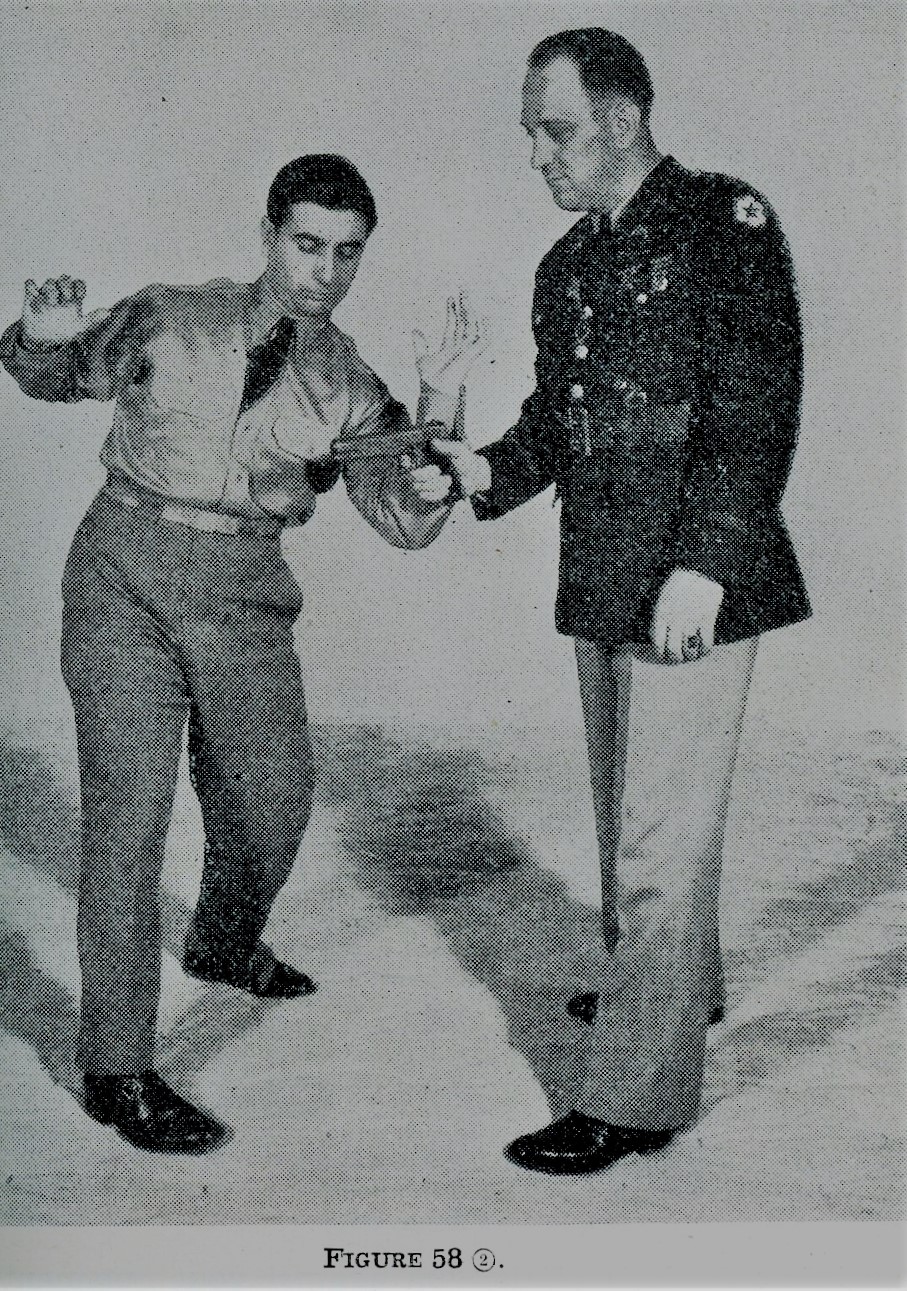
You will immediately grasp the barrel of the gun, assuring yourself that your hand is not near the muzzle, and at the same time push downward on your opponent’s right wrist (Figure 58-3).
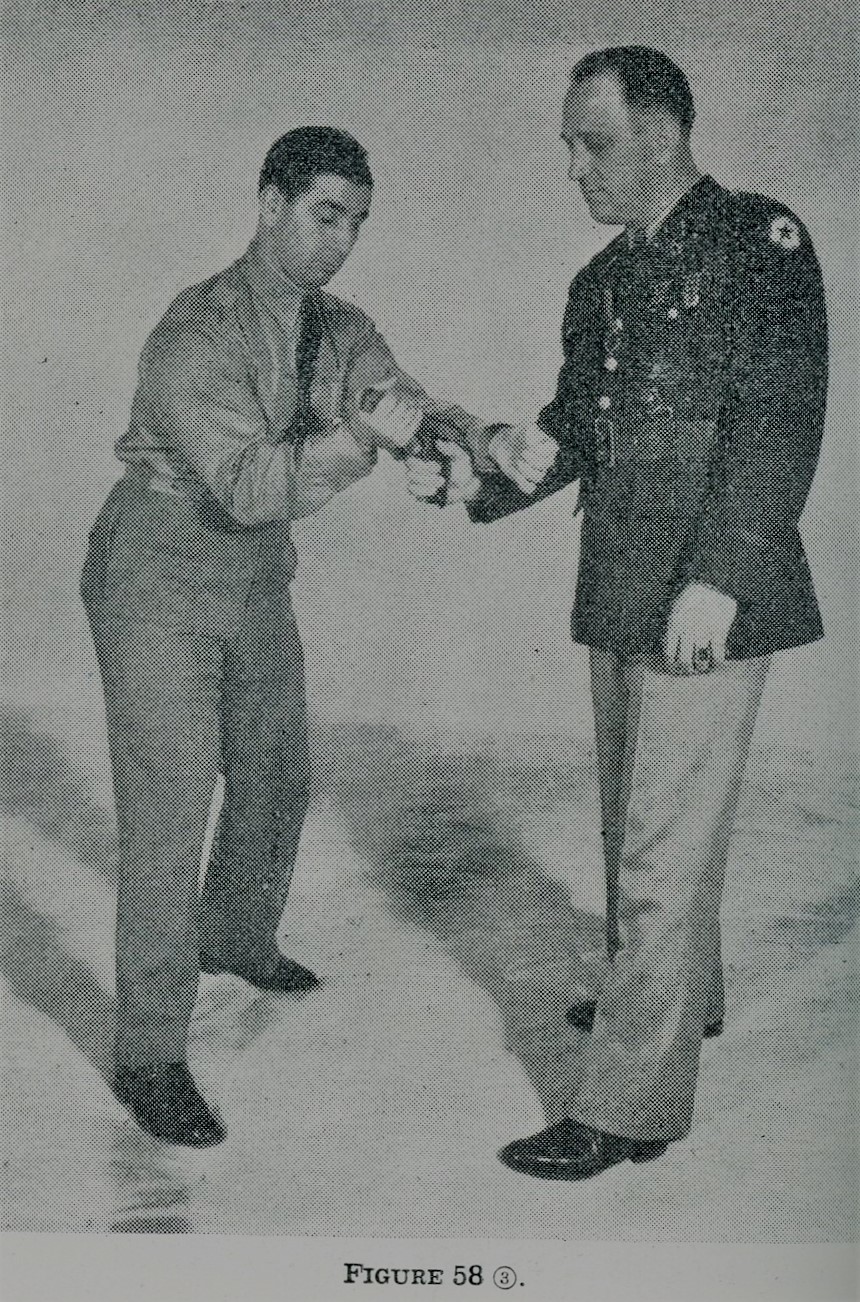
By maintaining pressure with your left hand, you will now have excellent fulcrum with your right hand to bend the gun backward, causing your opponent to release his grip (Figure 58-4).
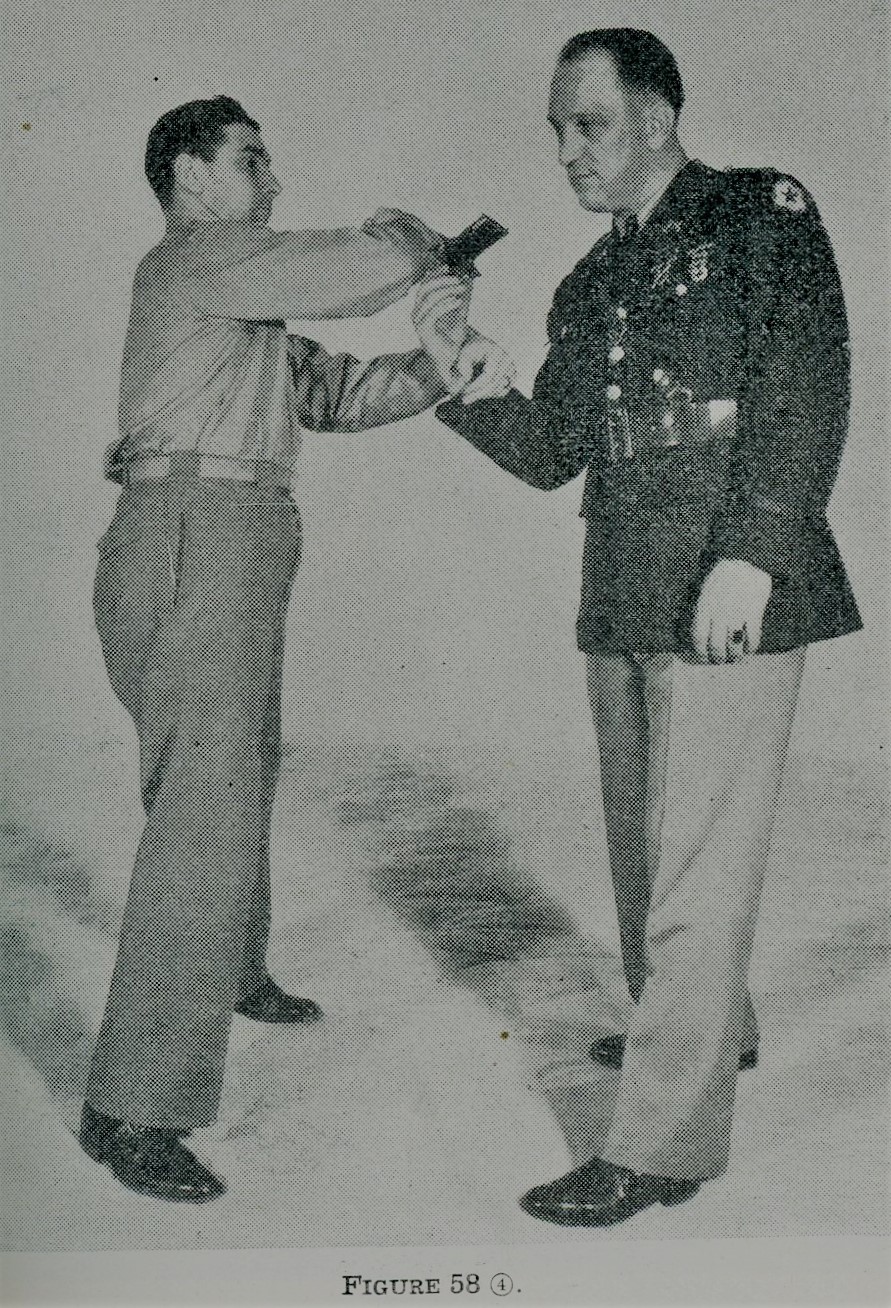
If he should retain his grip, his index finger will be broken. From this position you can bring the butt of the gun against your opponent’s right temple.
FIRST DEFENSE AGAINST GUN IN BACK (RIGHT HAND)
This defense should be used only when you are certain the gun is in your opponent’s right hand (Figure 59-1).

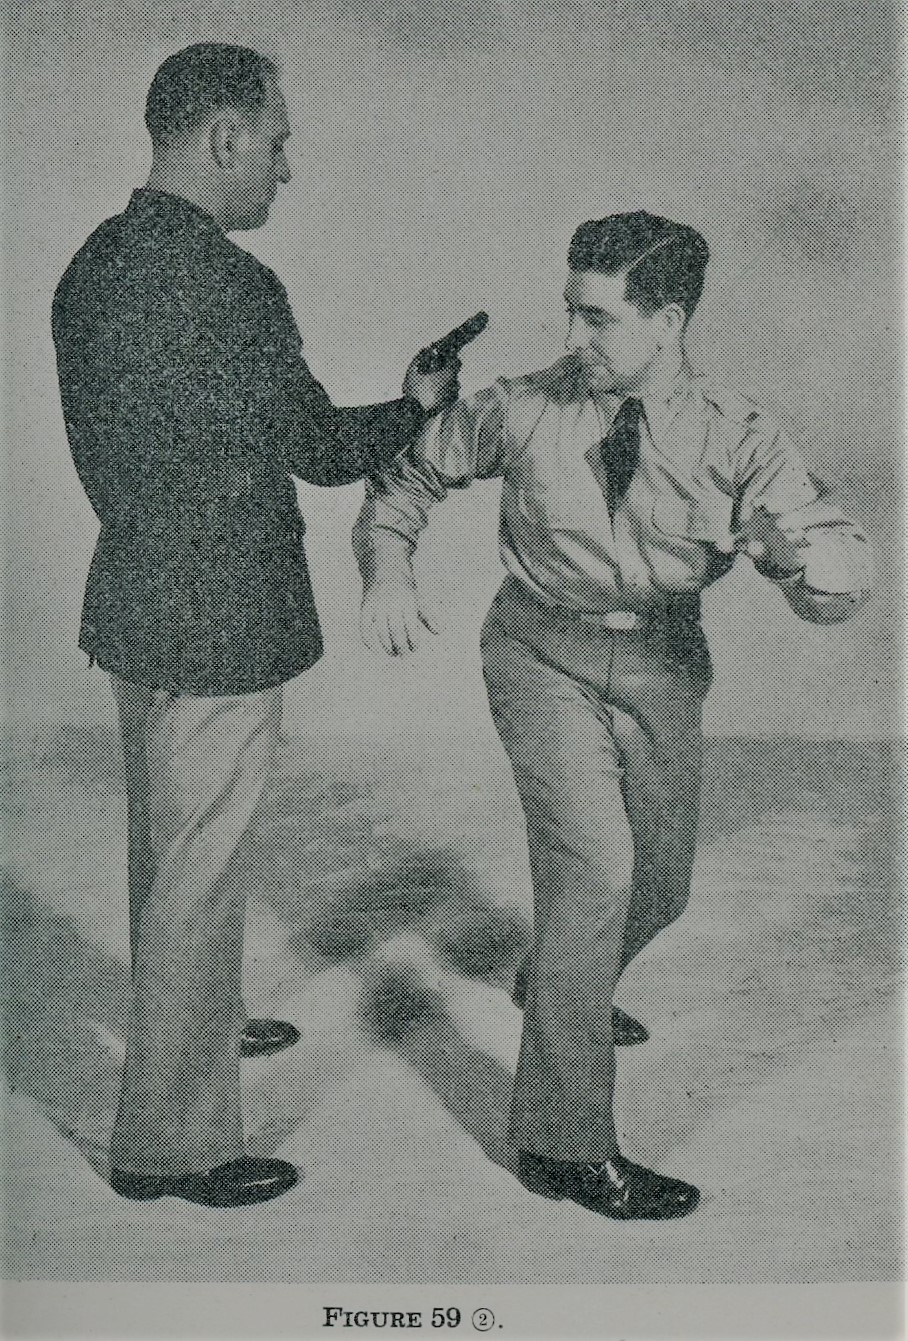
Also note again the elbows are as close to the waist as possible, even though the hands are elevated. You again execute the body side twist, at the same time bringing your elbow against your opponent’s forearm (Figure 59-2).
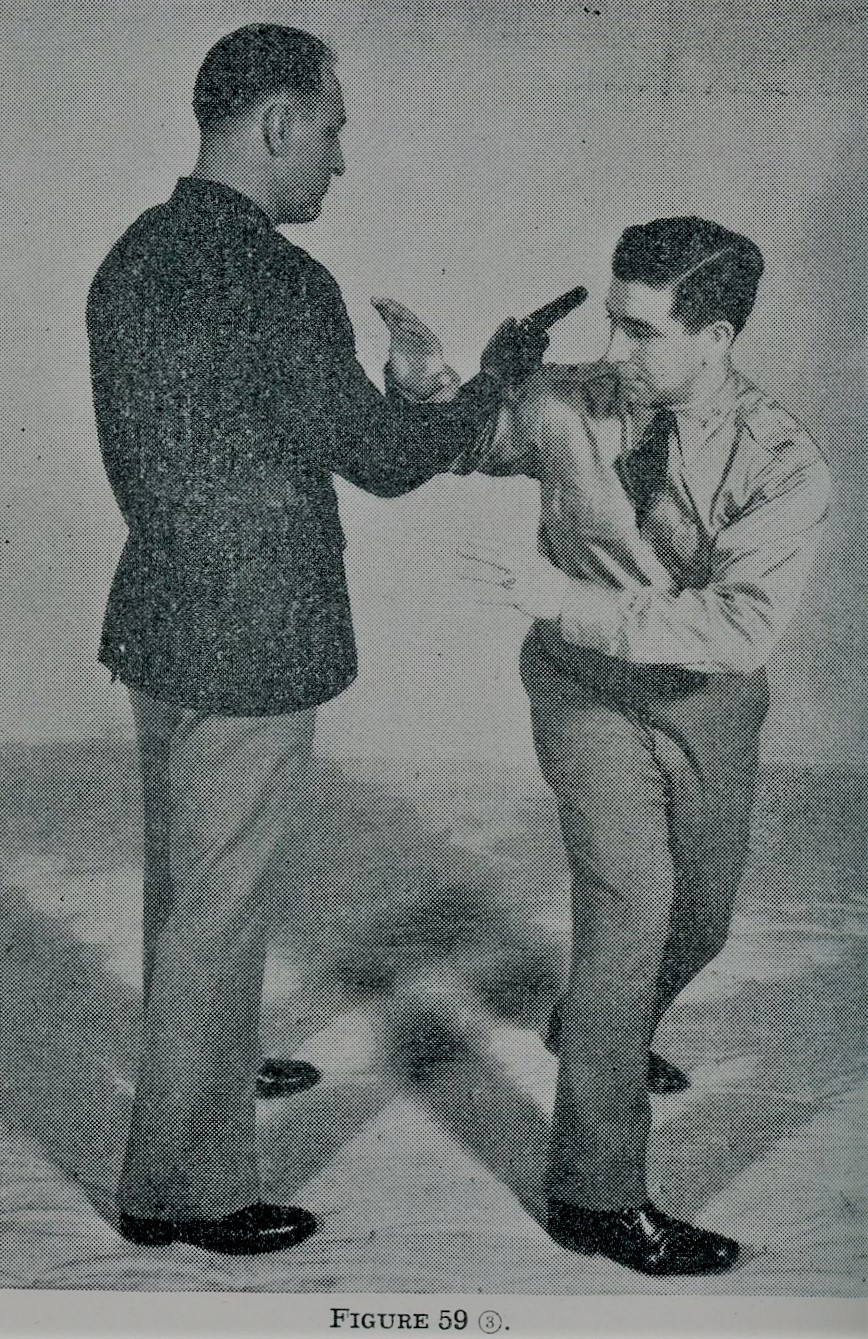
Note that the feet have not moved. The right arm is then brought under your opponent’s right forearm and placed on his elbow joint in such a manner that his forearm rests in the crook of your right elbow (Figure 59-3).
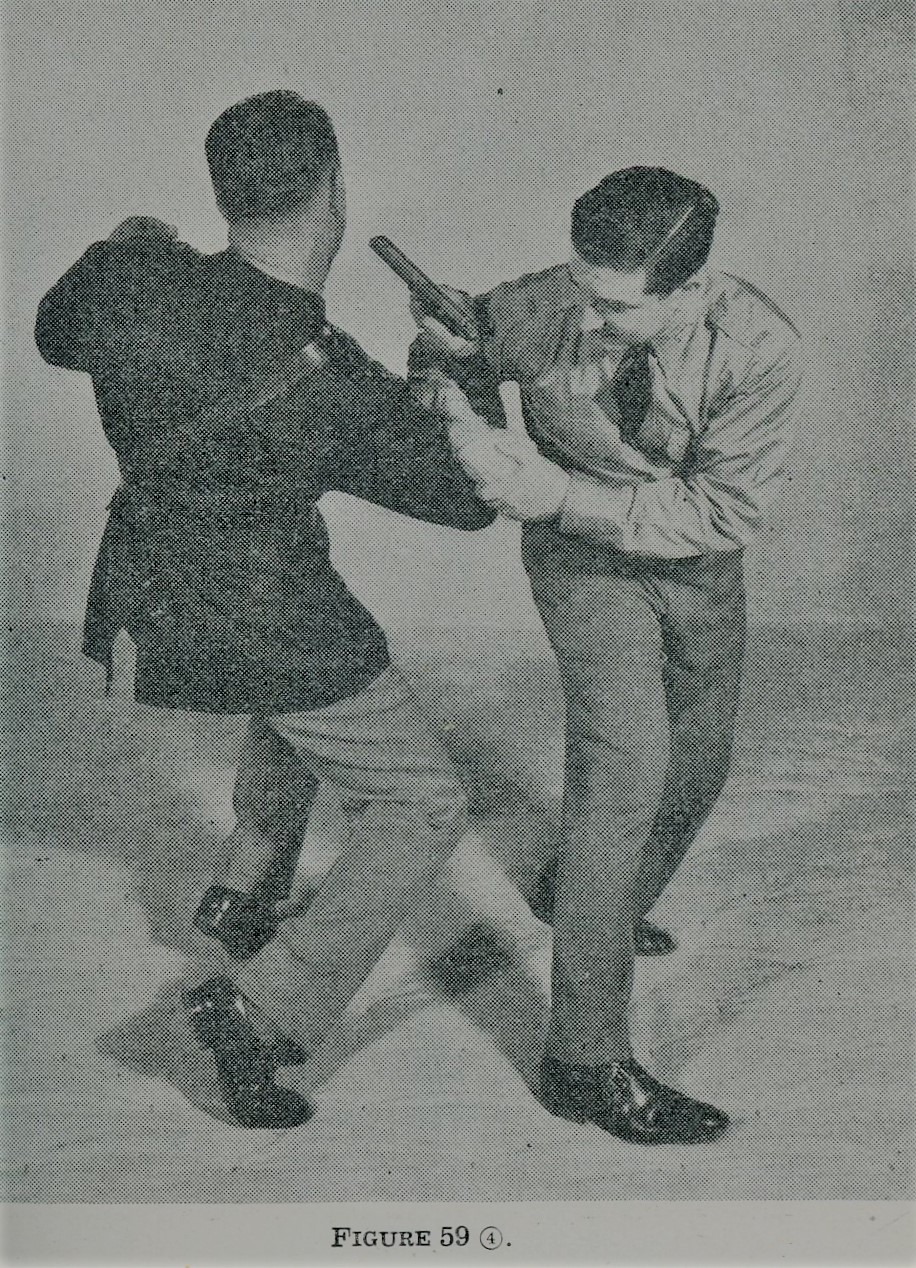
You will now place your left hand on top of your right and bend swiftly at the waist. This will bring your opponent to the ground and force him to drop his weapon (Figure 59-4).
FIRST DEFENSE AGAINST GUN IN BACK OF NECK (RIGHT HAND)
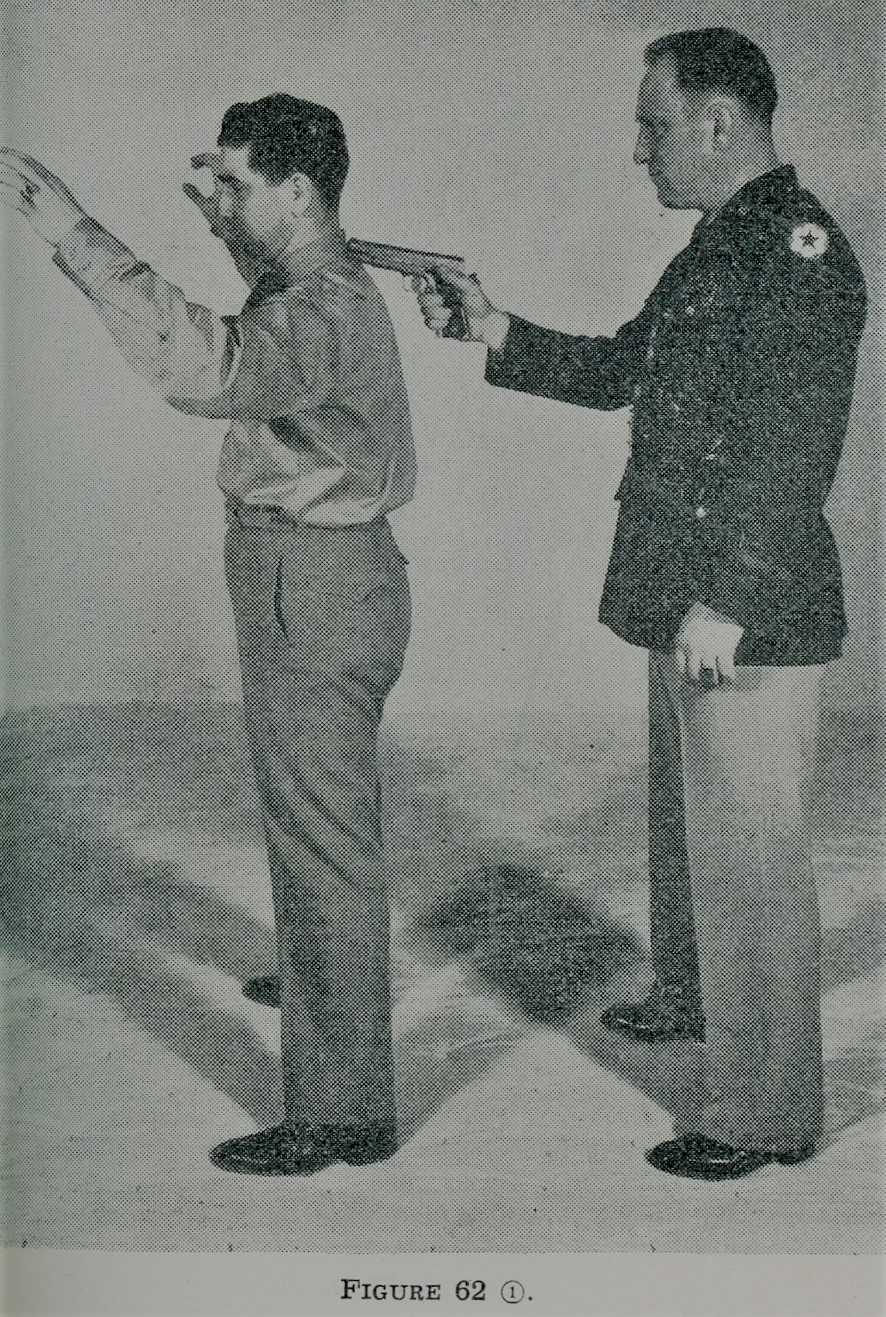
This defense is practical only when you are certain that the gun is held in the attacker’s right hand. Note that in raising the arms, the elbows are this time shoulder-high (Figure 62-1).
The body pivot is executed to the left, your left arm coming under your attacker’s right elbow (Figure 62-2).
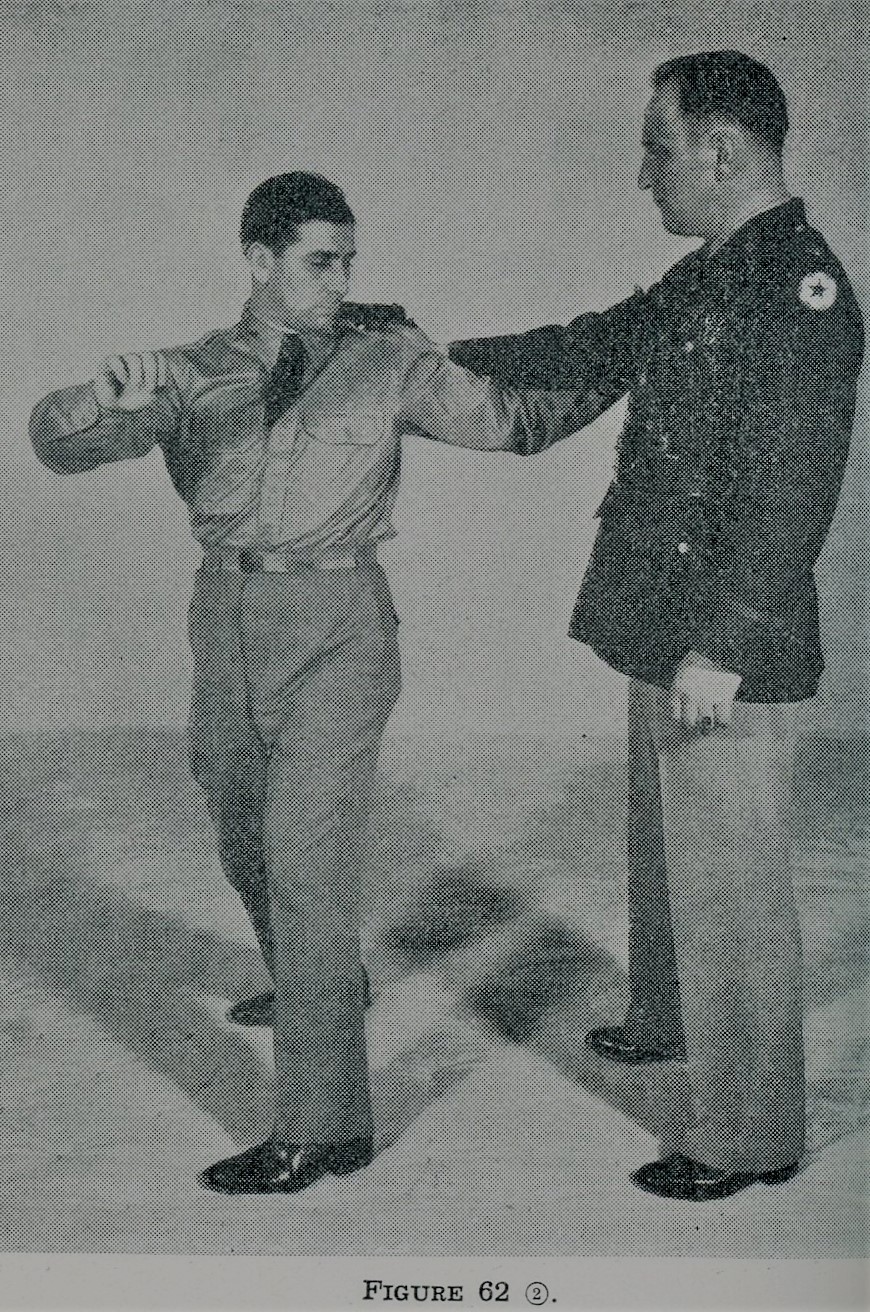
You then reach across with your right hand and grasp your own left hand. Twisting forward and bringing pressure to bear on your opponent’s elbow with your left forearm, you can either break the arm or force him to the ground, causing him to release his weapon, which is safely cuddled behind your neck (Figure 62-3).

DEFENSE AGAINST RIFLE IN FRONT
Figure 67-1 illustrates the hold-up.
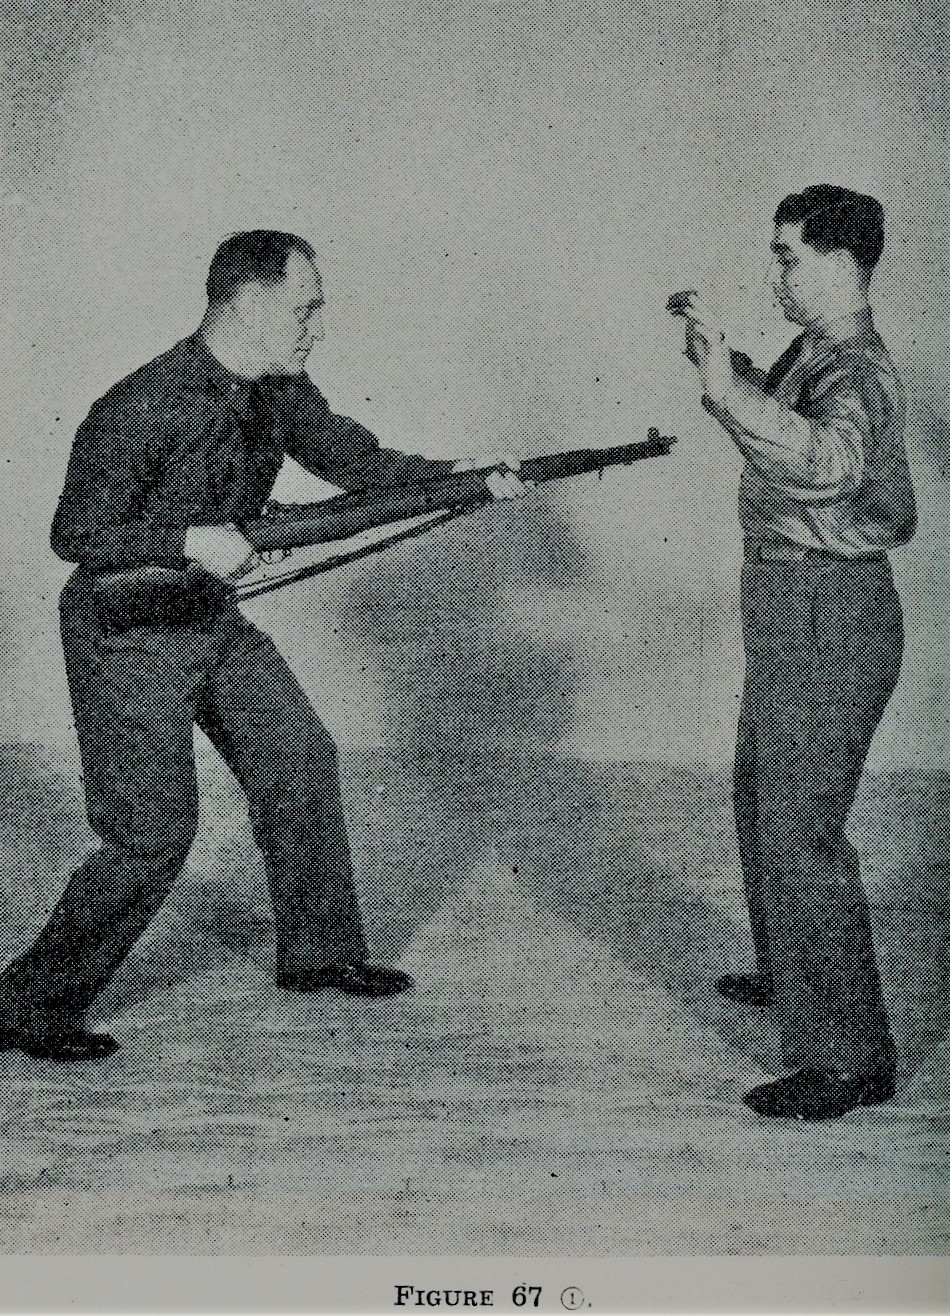
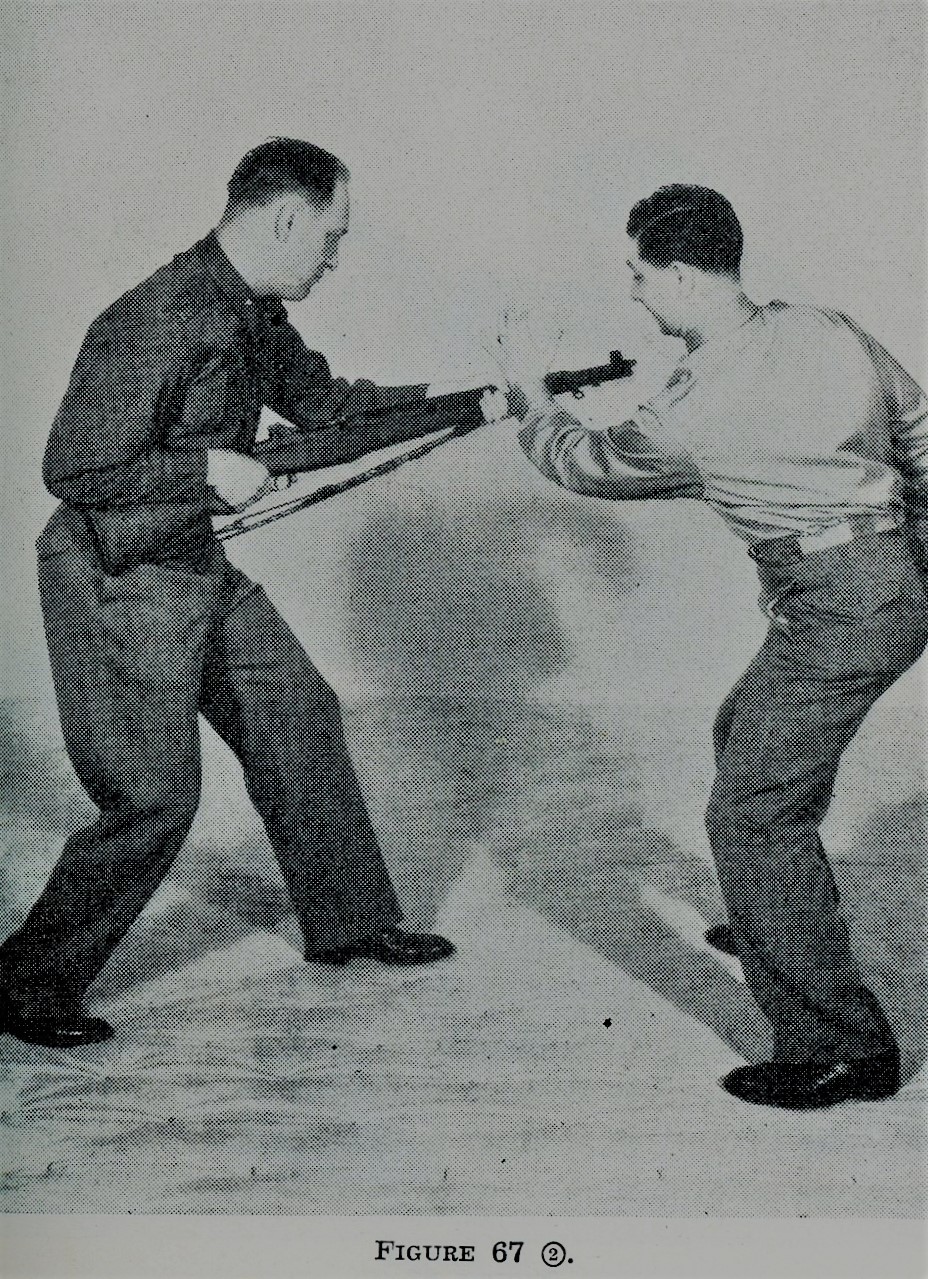
At his order of “Hands up,” you start to obey. As your hands reach the level of your shoulders, you immediately execute the body twist to the right as previously described and strike the muzzle of the rifle away from your body with your left forearm and wrist (Figure 67-2).
You immediately follow this movement by stepping forward with your left foot, grasping the rifle over your opponent’s left hand with your right one, and grasping his right hand, with your left one, thus preventing him from following through with a butt stroke (67-3).
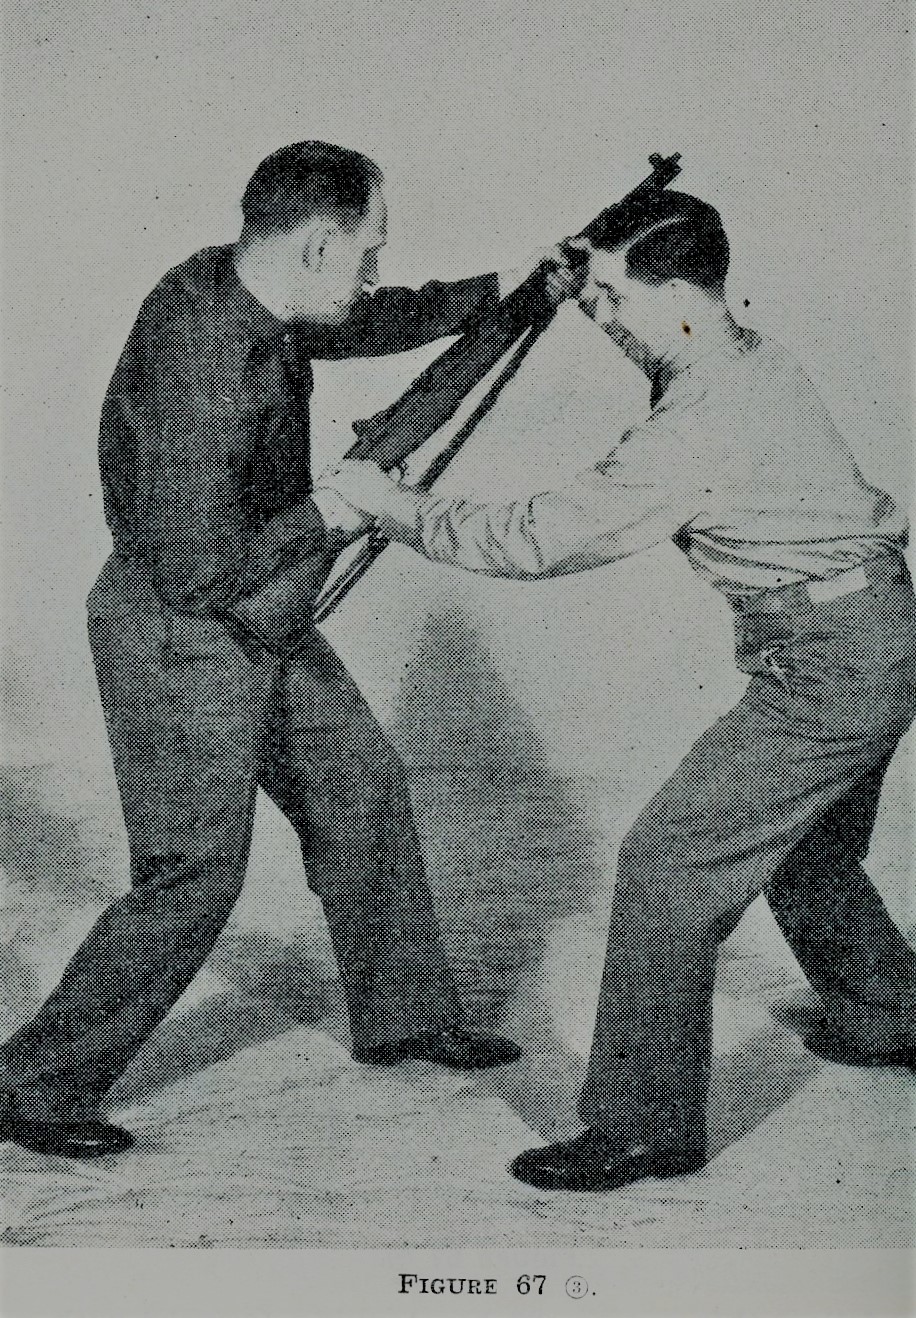
You are now in excellent position to apply leverage, pulling with your left hand and pushing with your right one, at the same time stepping to your opponent’s right with your own right foot. This will take him off balance and at the same time enable you to strike him on the head with the muzzle of the rifle (Figure 67-4).

DEFENSE AGAINST GRIP ON GARMENT, THUMB OUT
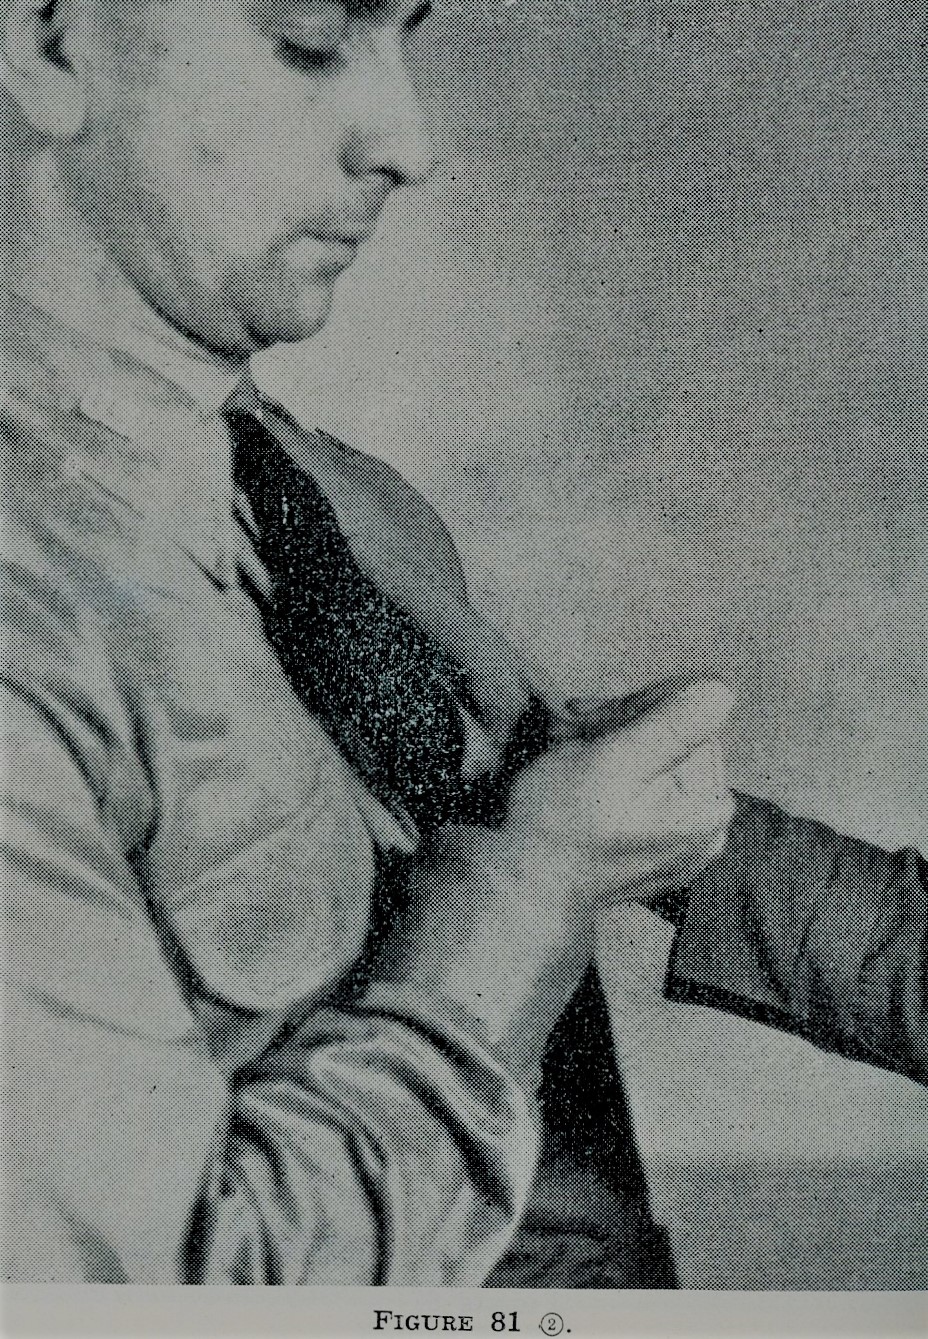
When your shirt or tie is gripped with the thumb out as illustrated in figure 81-1, you will immediately reach up with your right hand, placing the four fingers around the base of your attacker’s thumb along the back of his hand, while the entire first and second joints of your thumb are placed under the inside of his thumb and pressed backward (Figure 81-2). With this hold your opponent can be brought to the ground with very little effort.

DEFENSE AGAINST HAIR HOLD FROM REAR
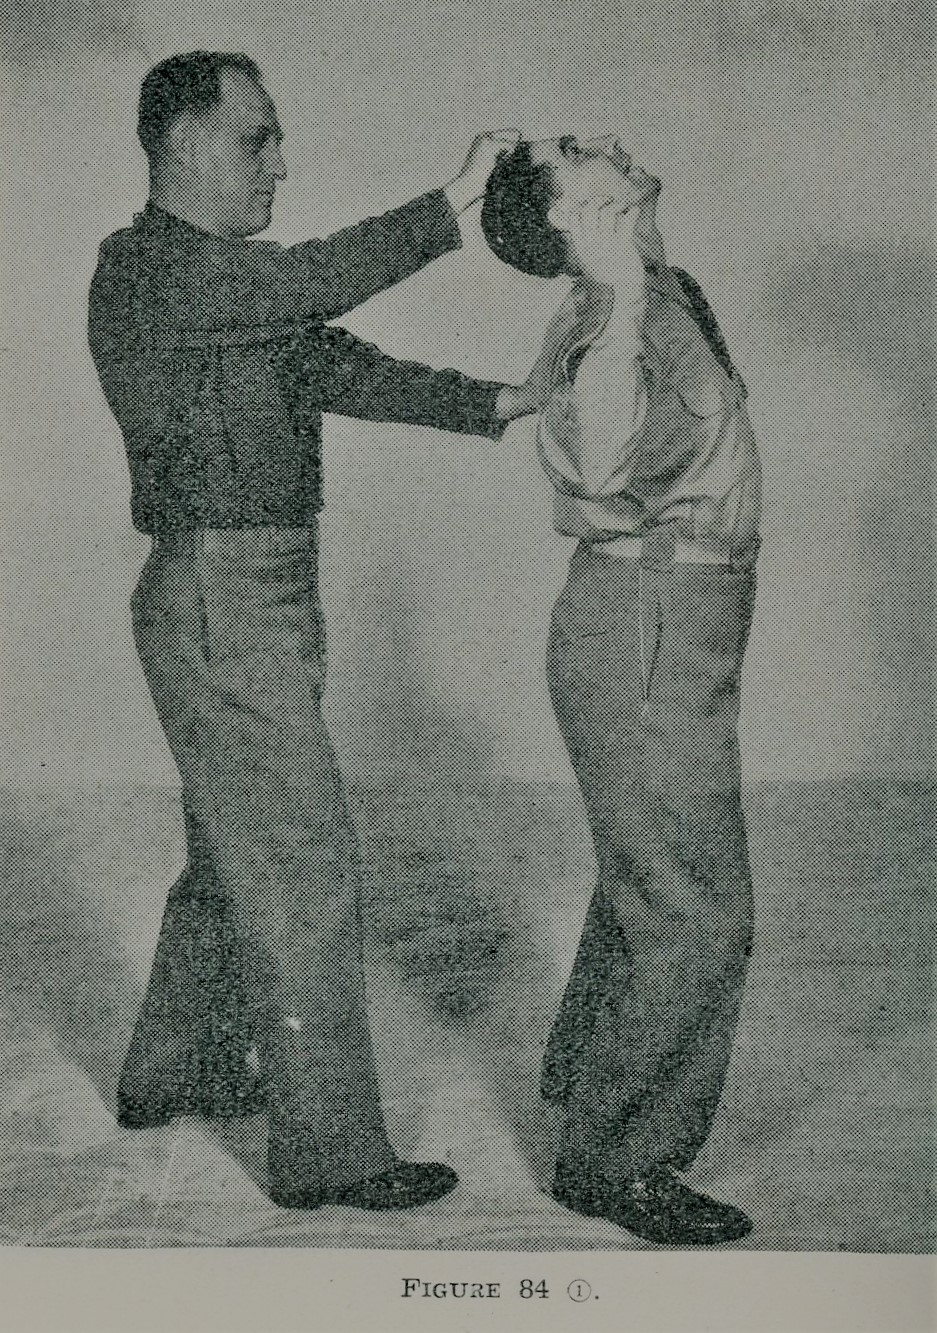
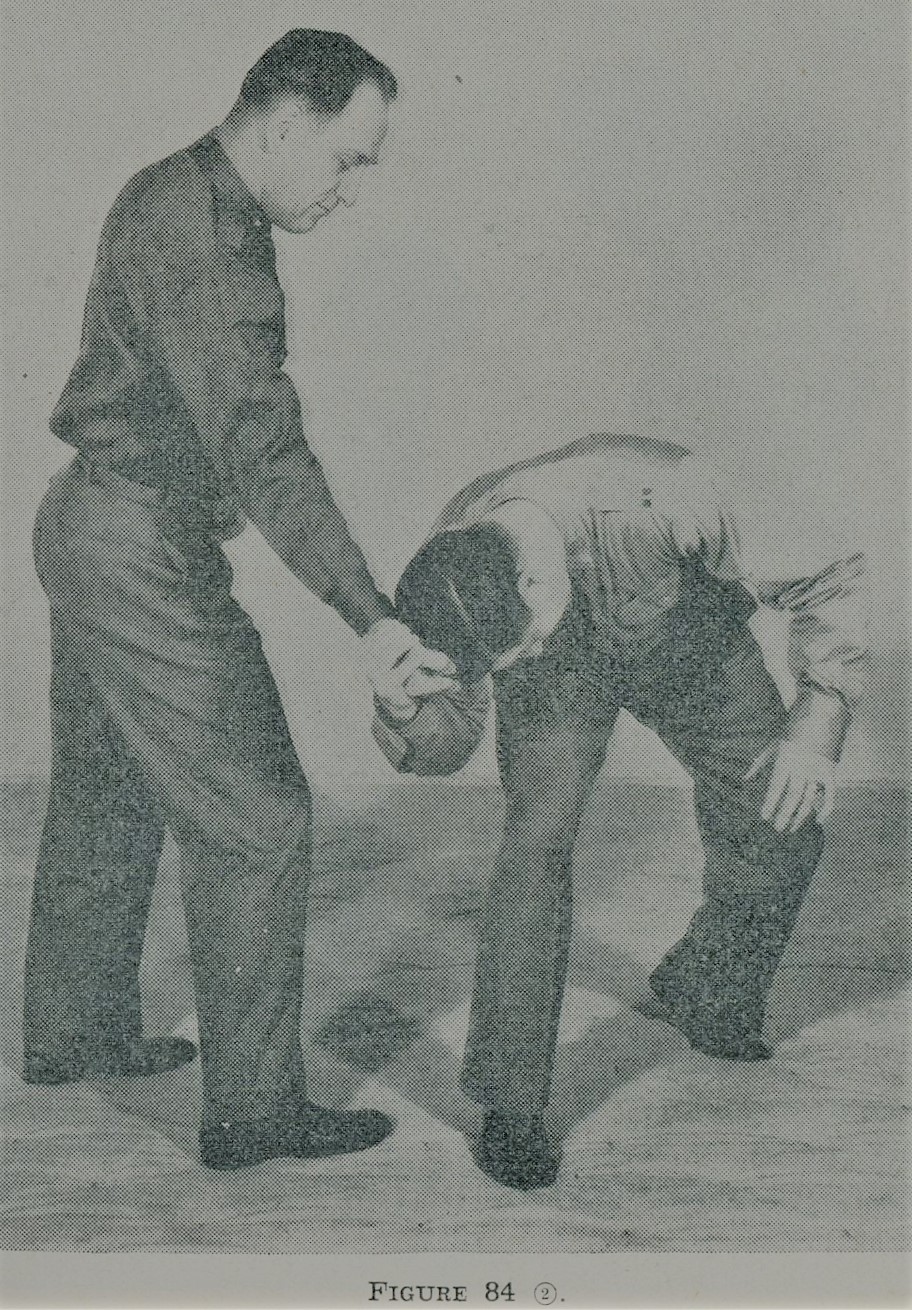
Figure 84-1 illustrates the original attack. Before turning your body, your right hand reaches upward and is placed over your opponent’s right hand, your four fingers wrapped around the base of his thumb on the back of his hand. You now execute a half right-face, bending from the waist, getting your head as close to the ground as possible. The strain on your opponent’s wrist will cause him to loosen his grip (Figure 84-2).
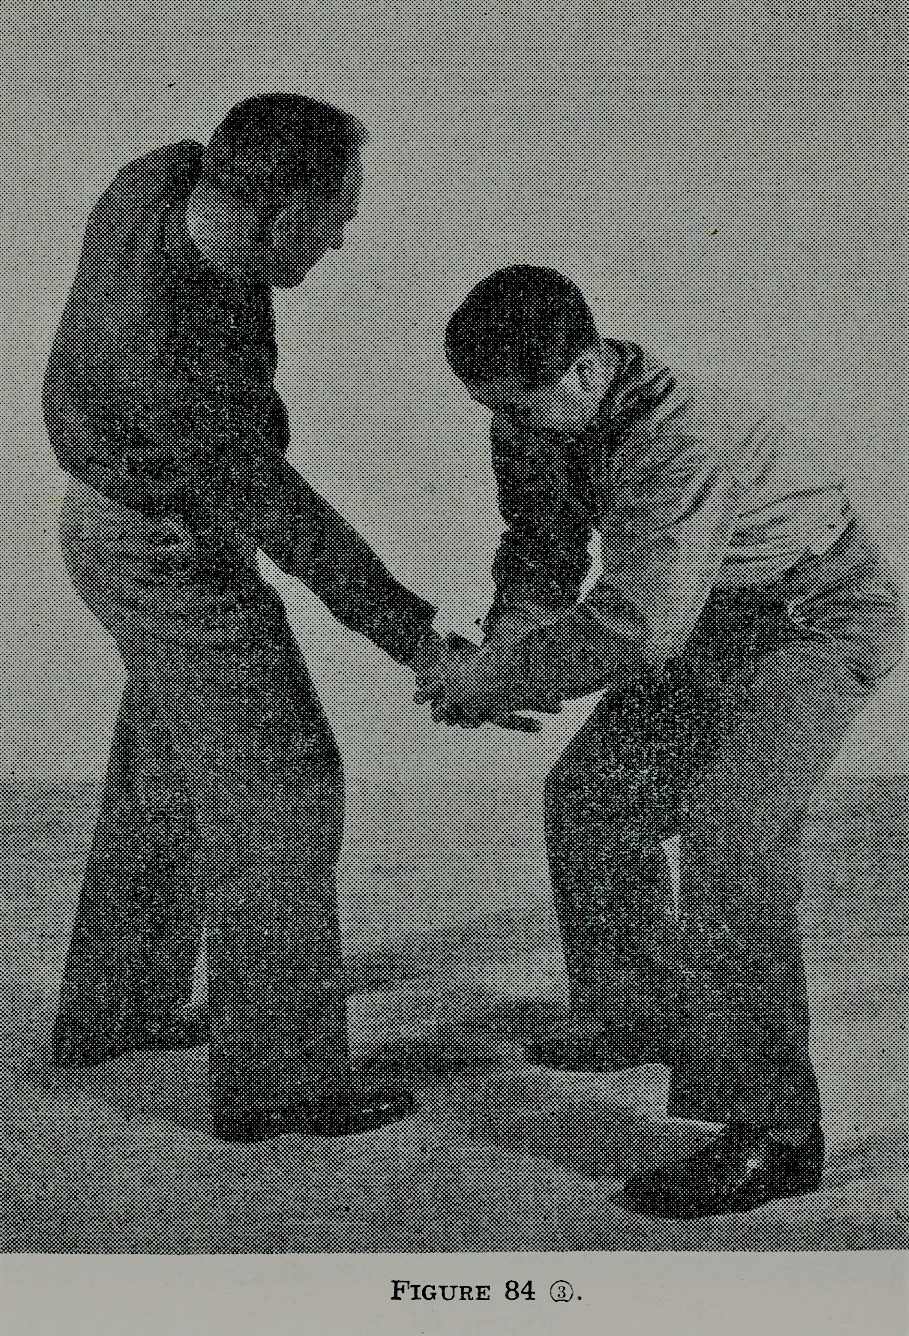
You will now pivot on your right foot, facing your opponent, and reinforcing your original hold with a similar hold with your left hand, twist powerfully to your left. Your opponent will either execute a complete somersault or suffer a broken wrist (Figure 84-3).
The post Unarmed Self-Defense From WWII appeared first on The Art of Manliness.
(via The Art of Manliness)


